Since August, I’ve been gradually adding to my vintage-inspired clothing “stash,” for lack of a better word. It has mostly been clothes for school, which started in late August for me, but also two garments for events. Because there is a lot to cover here (I made 5 garments!), I’m going to do two posts. Hopefully, the second one will be out by the end of the weekend.
Unrelated: I’ve been doing a lot of historical sewing as well lately, but I’ll discuss that in a series of later posts, so keep your eye out.
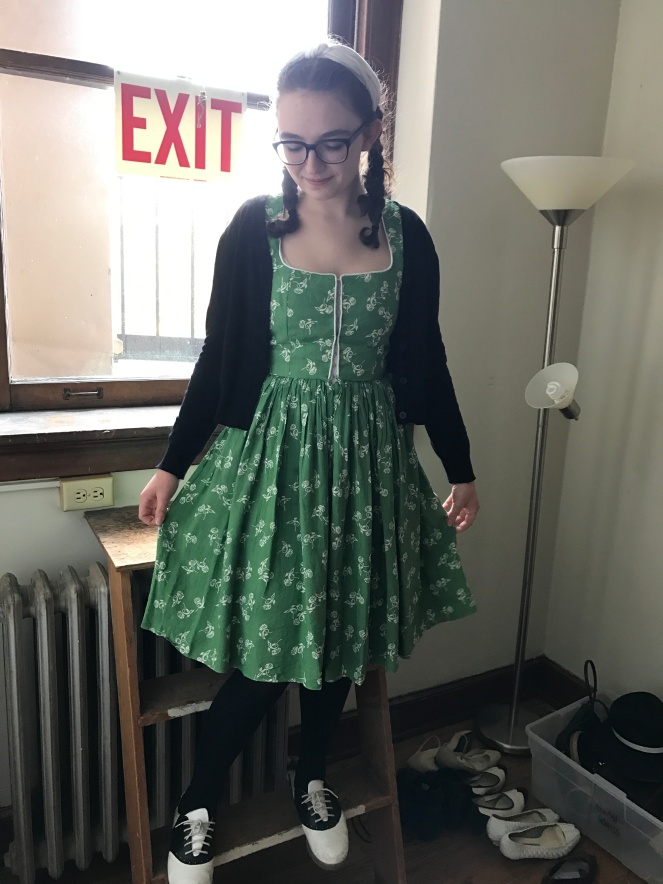
The first thing I made was a dirndl dress from Gertie’s Butterick collection, pattern B6352. This dress originally had a zipper down the front, a gathered circle skirt, and a ruffle around the bottom of the skirt, but I only had 4 yards of rayon (the pattern called for 5 or 6 yards) and I dislike zippers, so I made some alterations to the pattern.
Before I discuss those alterations, allow me to digress about this fabric: it’s lovely. I bought it from the Etsy shop The Vintage Nerd Sews, and the proprietress of the shop was very helpful when I asked about the fabric. The fabric itself is a green rayon with irregular ridges, almost like dupioni. It was exactly what I had in mind when I was searching, so thankfully I was able to buy it for this.
Anyway, those aforementioned alterations consisted of using hook and eye tape for the front closure, gathering a rectangle for the skirt, and omitting the ruffle. I was able to cut the skirt on the selvage edge, so I didn’t have to think about hemming, which was a relief.
The construction was rather complicated, because I flat lined the bodice with heavy canvas to compensate for the rayon’s slippery nature. I also fully lined the bodice, and finished every seam. The neckline and cap sleeve cuffs were piped with white piping, and a lot of the finishing was done by hand to ensure neatness.
I still need to add a modesty panel into this, but I’m debating doing that because I would just use a piece of white fabric, and it’s easier to wear a white tank top. We shall see.
Here are some construction pictures:


For some reason, I had such a hard time photographing this dress when worn, because I would forget to ask a friend to photograph it at school, or I would feel awkward getting photos on the school grounds, or the photos would be blurry, so even though I wore it as much as I could before the weather became too cold, my photos are sub-par. The best ones were taken in the window of my school’s costume closet by a friend.


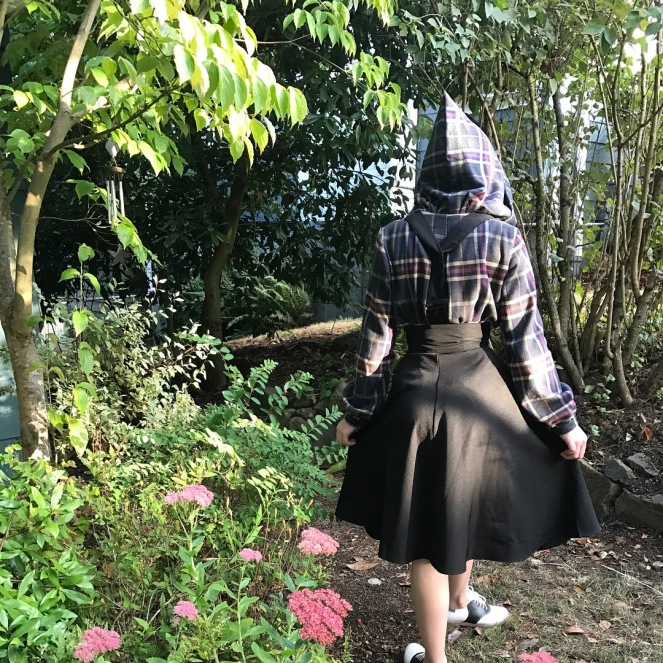
The next thing I made was a hooded flannel from the Simplicity 8447 pattern. The pattern is great, and I cannot wait to make the overalls and the pants, but the hooded flannel captured my heart as soon as I saw it, and I had to make one. In fact, I’m trying to start a hooded flannel revolution among my peers because they’re so comfortable and chic, and one of my friends has made one thus far. Another has the pattern at the moment, and when I get it back, I plan on making several to give as gifts and for myself. The pattern is simply that amazing.
Anyway, on to construction: Using a cotton flannel from Joann’s, I followed the pattern for the most part, making up my own instructions where I thought Simplicity’s were unnecessarily complicated. I finished almost all of the seams, with the exception of the armscyes, but I may neaten those by hand if fraying becomes a problem. I also tacked down all of the facings by hand for a clean finish.
Here are some pictures, in which I was also wearing a high-waisted skirt, because I like how it makes the shirt more fitted.

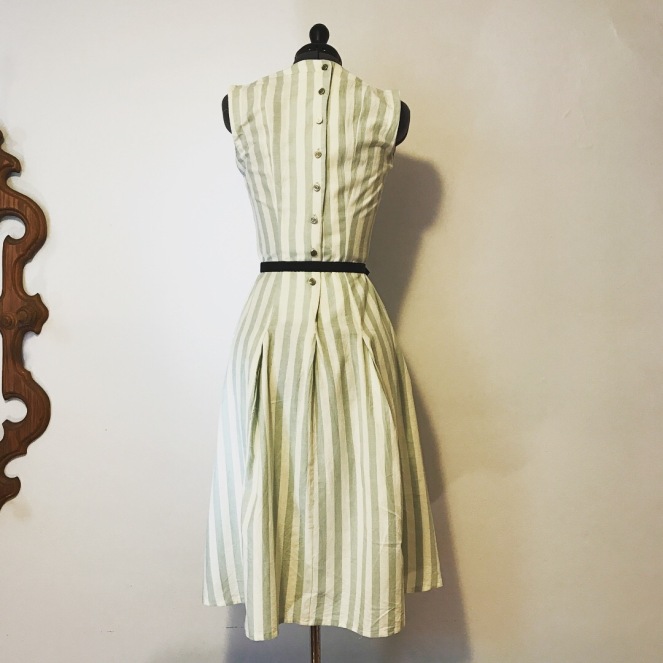
The next thing I made was from a vintage pattern, Hollywood 1938, which was printed in 1946. The instructions were rather unclear, so I mostly made them up as I went along, which worked out very well.
Before making my dress, I made a mockup because I wanted a perfect fit, and luckily, the pattern fit me perfectly, without any alteration, which is unusual for me because I have a long waist. Once I was certain it fit, I used a plain, if a bit sheer, striped cotton from a local fabric store, Drygoods Design, for the dress, and I decided against trimming it because I liked the simplicity of the blue-grey stripes. I especially like the pockets, which fit my phone and gloves perfectly, because of the contrast in the stripe direction. I was running out of interfacing as I made this, so the interfacing on the neck and back facing is very spotty, but it works. I finished all of the facings, and tacked them down by hand, and after that, I added buttons.
I wear this over a 1940s cotton slip, because the fabric is fairly sheer, which has inspired me to make myself more slips, because they’re so pretty and because I have an original pattern from the early 1940s. Hopefully, those dreams will come to fruition soon.
I’m also wearing a black belt to define the waist, because the princess seams do not to that very much on their own.
Here are the pictures:


That’s the end of Part I! Thanks for reading, and keep and eye out for another post very soon.

I love that dress and those shoes. The plaid shirt is gorgeous. I love anything plaid. Thank You for sharing.
Marilyn
LikeLike
Thank you for reading!
LikeLike