In which I continue my tradition of updating my blog about projects that have been completed long since.
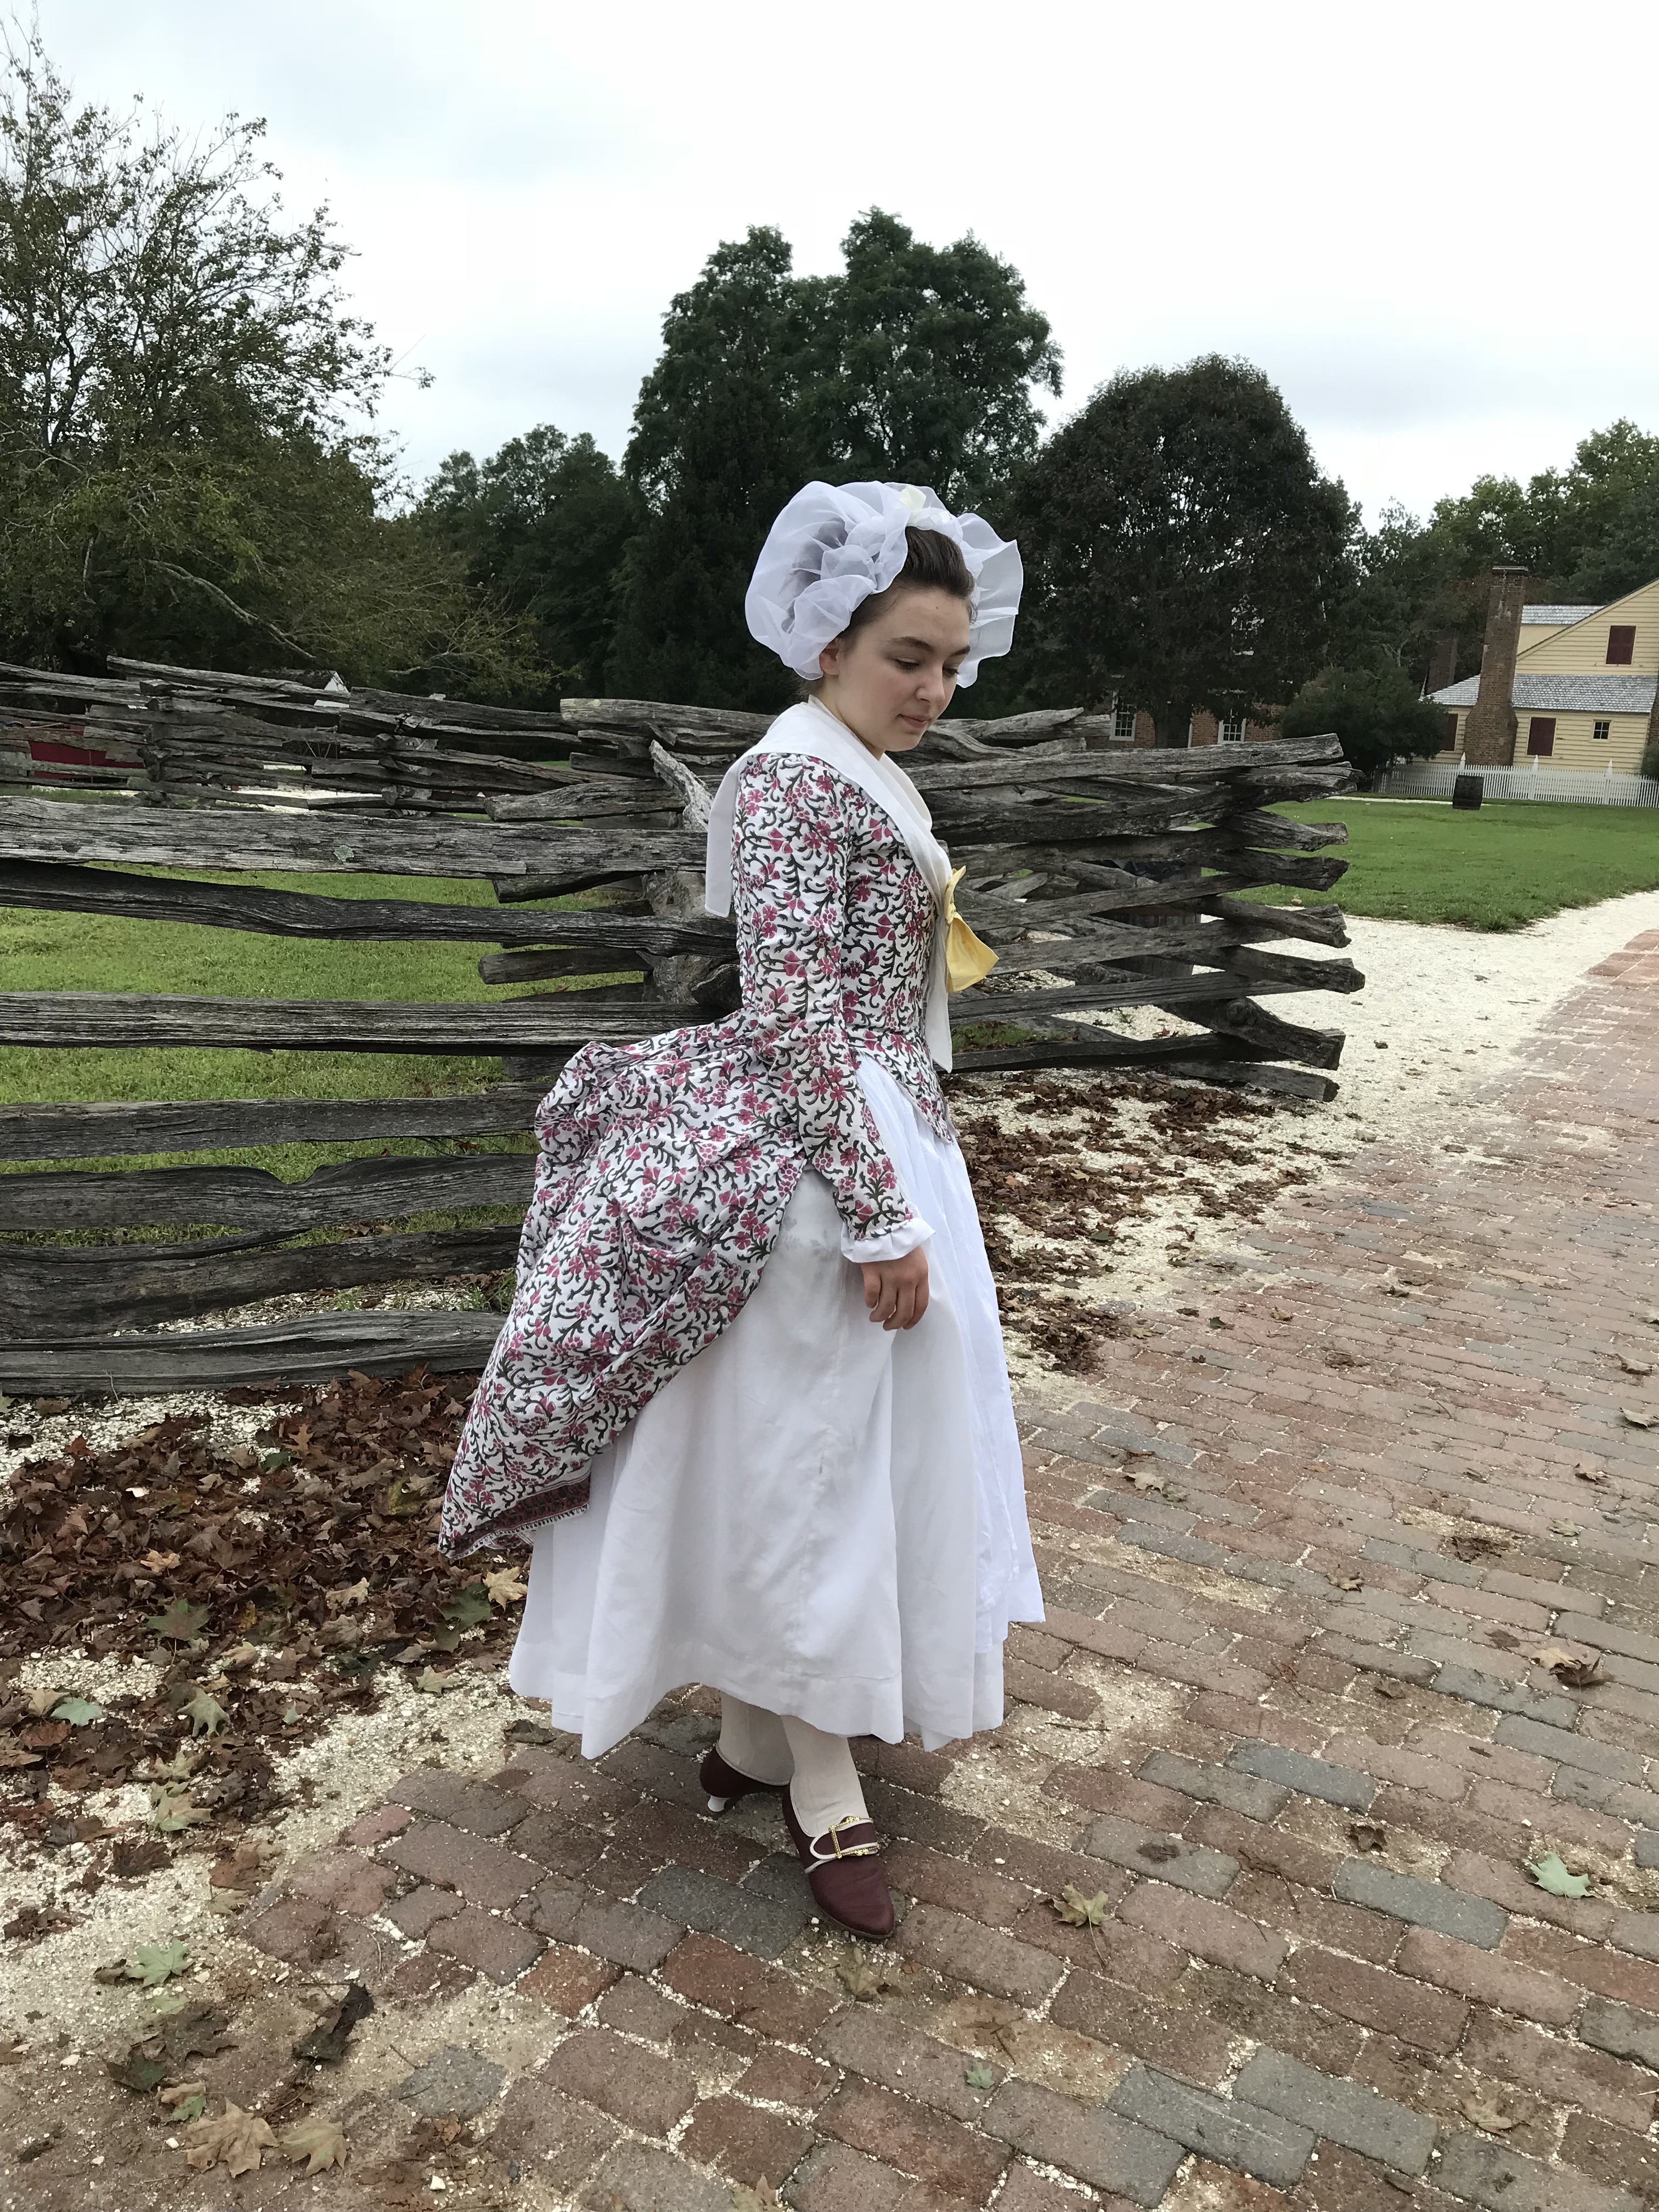
As a part of my long-running scheme to recreate the ensemble worn in William Redmore Bigg’s 1782 painting “A Girl Gathering Filberts,” I decided to make a yellow wool Italian gown.
“A Girl Gathering Filberts”
Her gown looks fairly typical of the date – elbow length sleeves, fitted closed-front bodice, a gauze tucker around the neckline. I surmised that it was an Italian gown based on the date, but it could just as easily be an English or “night” gown. To be honest, I wanted an excuse to make another Italian gown, so I went with the former option. The one bit of weirdness is the cuffs – they look decidedly out of fashion for 1782. My guess is that they’re either a very specific regional fashion, that the gown is slightly out of style, or that the sleeves were tacked back in a cuff shape to shorten them without wasting valuable fabric. In my recreation, I went with the last guess, which I will explain further.
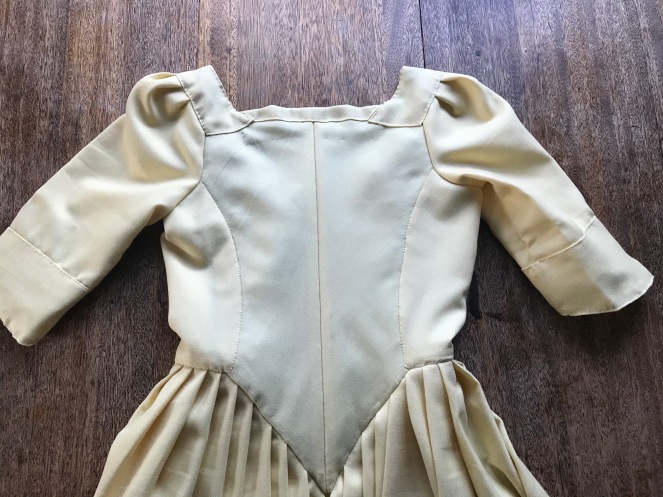
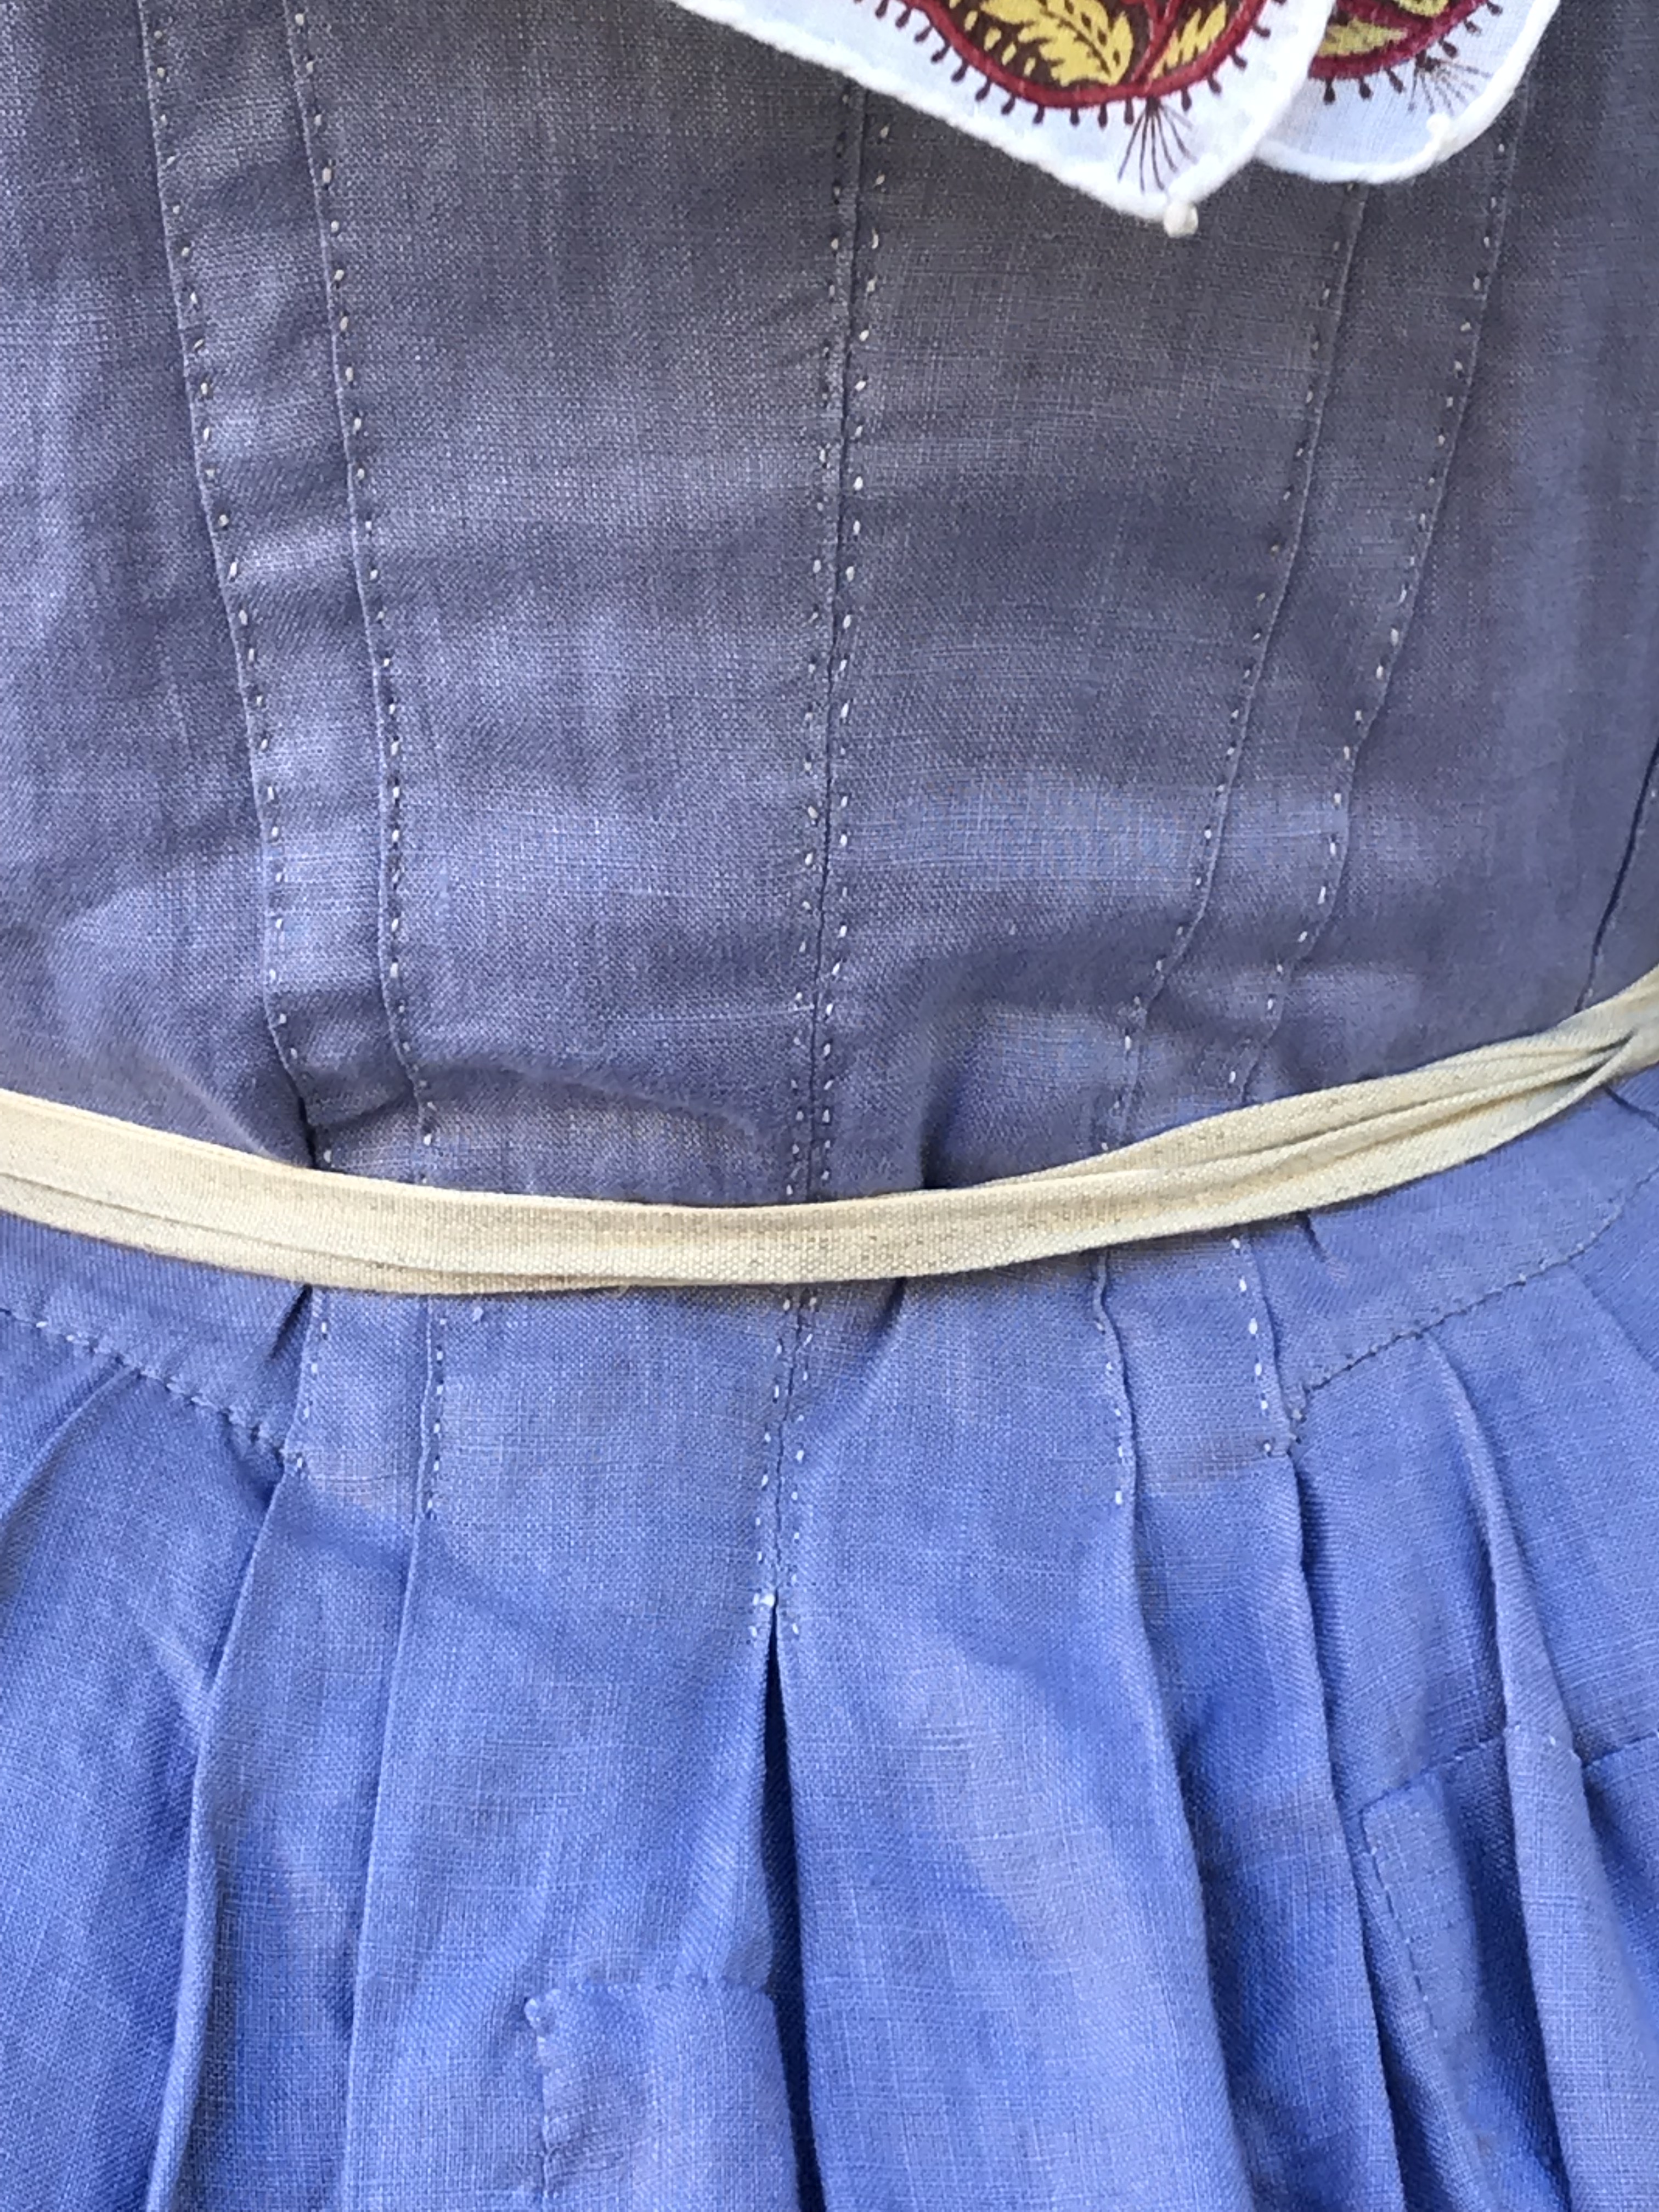
I didn’t take a ton of progress shots while making this gown, but my first steps after cutting out the fabric was to stitch boning channels in the center back of the gown and seam them together with an English stitch. The bodice fronts were attached to the back of the gown with whip stitches, and I folded under and basted the seam allowance along the bottom edge. The bottom edge of the back of the gown was also basted under so that it could be attached to the skirts later.
Everything was basted to prevent the fashion fabric and lining from moving around, and then I attached the shoulder straps with whip stitches. After a try-on, I marked the neckline.
After this, I finished the edges of the bodice, but I neglected to take photos of that step.
Next, I turned my attention to the sleeves. The hem of the cuff was basted down on each sleeve piece, and then they were assembled. Once the sleeve seam was done, I stitched together the hems of the lining and the fashion fabric, securing both with one seam.
Cuff hems basted and pinned together
With the sleeves done, I turned to the skirts. I had hemmed these a while ago (it was a mindless project that I was able to do while watching a film for class), so it was only a matter of pleating the skirts, basting the pleats in place, and whip stitching the pleats to the bottom edge of the bodice.
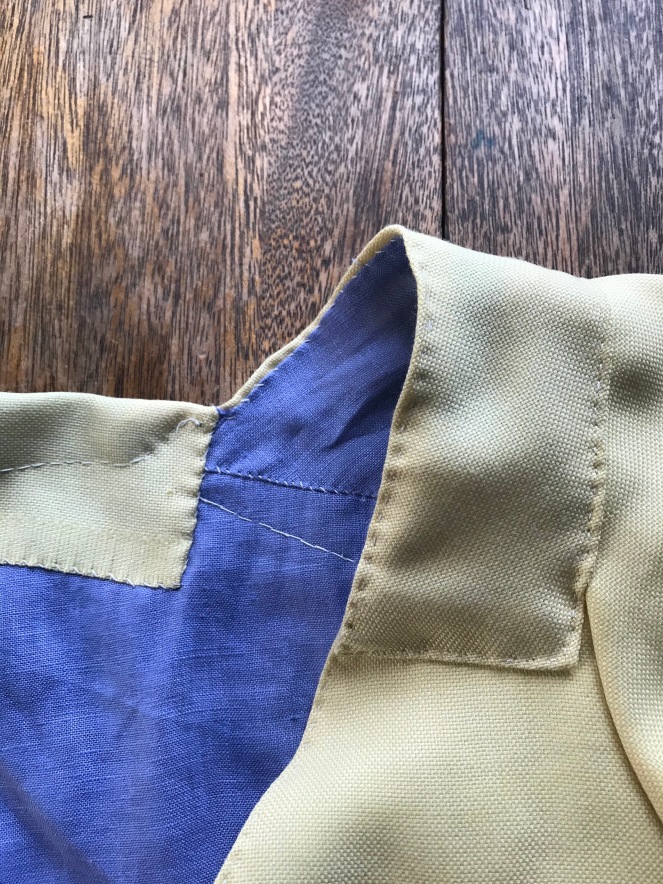
Once the skirts were attached, I set the sleeves, attached the fashion fabric to the shoulder straps, and bound the top edge of the back of the bodice. To recreate the cuffs of the gown in the portrait, I first tried to make a fabric cuff, but then I had the idea to fold back the bottom of the sleeve, stitching it to look like a cuff, even though it’s the same piece of fabric as the sleeve. I’m not sure if that makes sense, so let me know if you’d like a more in-depth post about these cuffs.
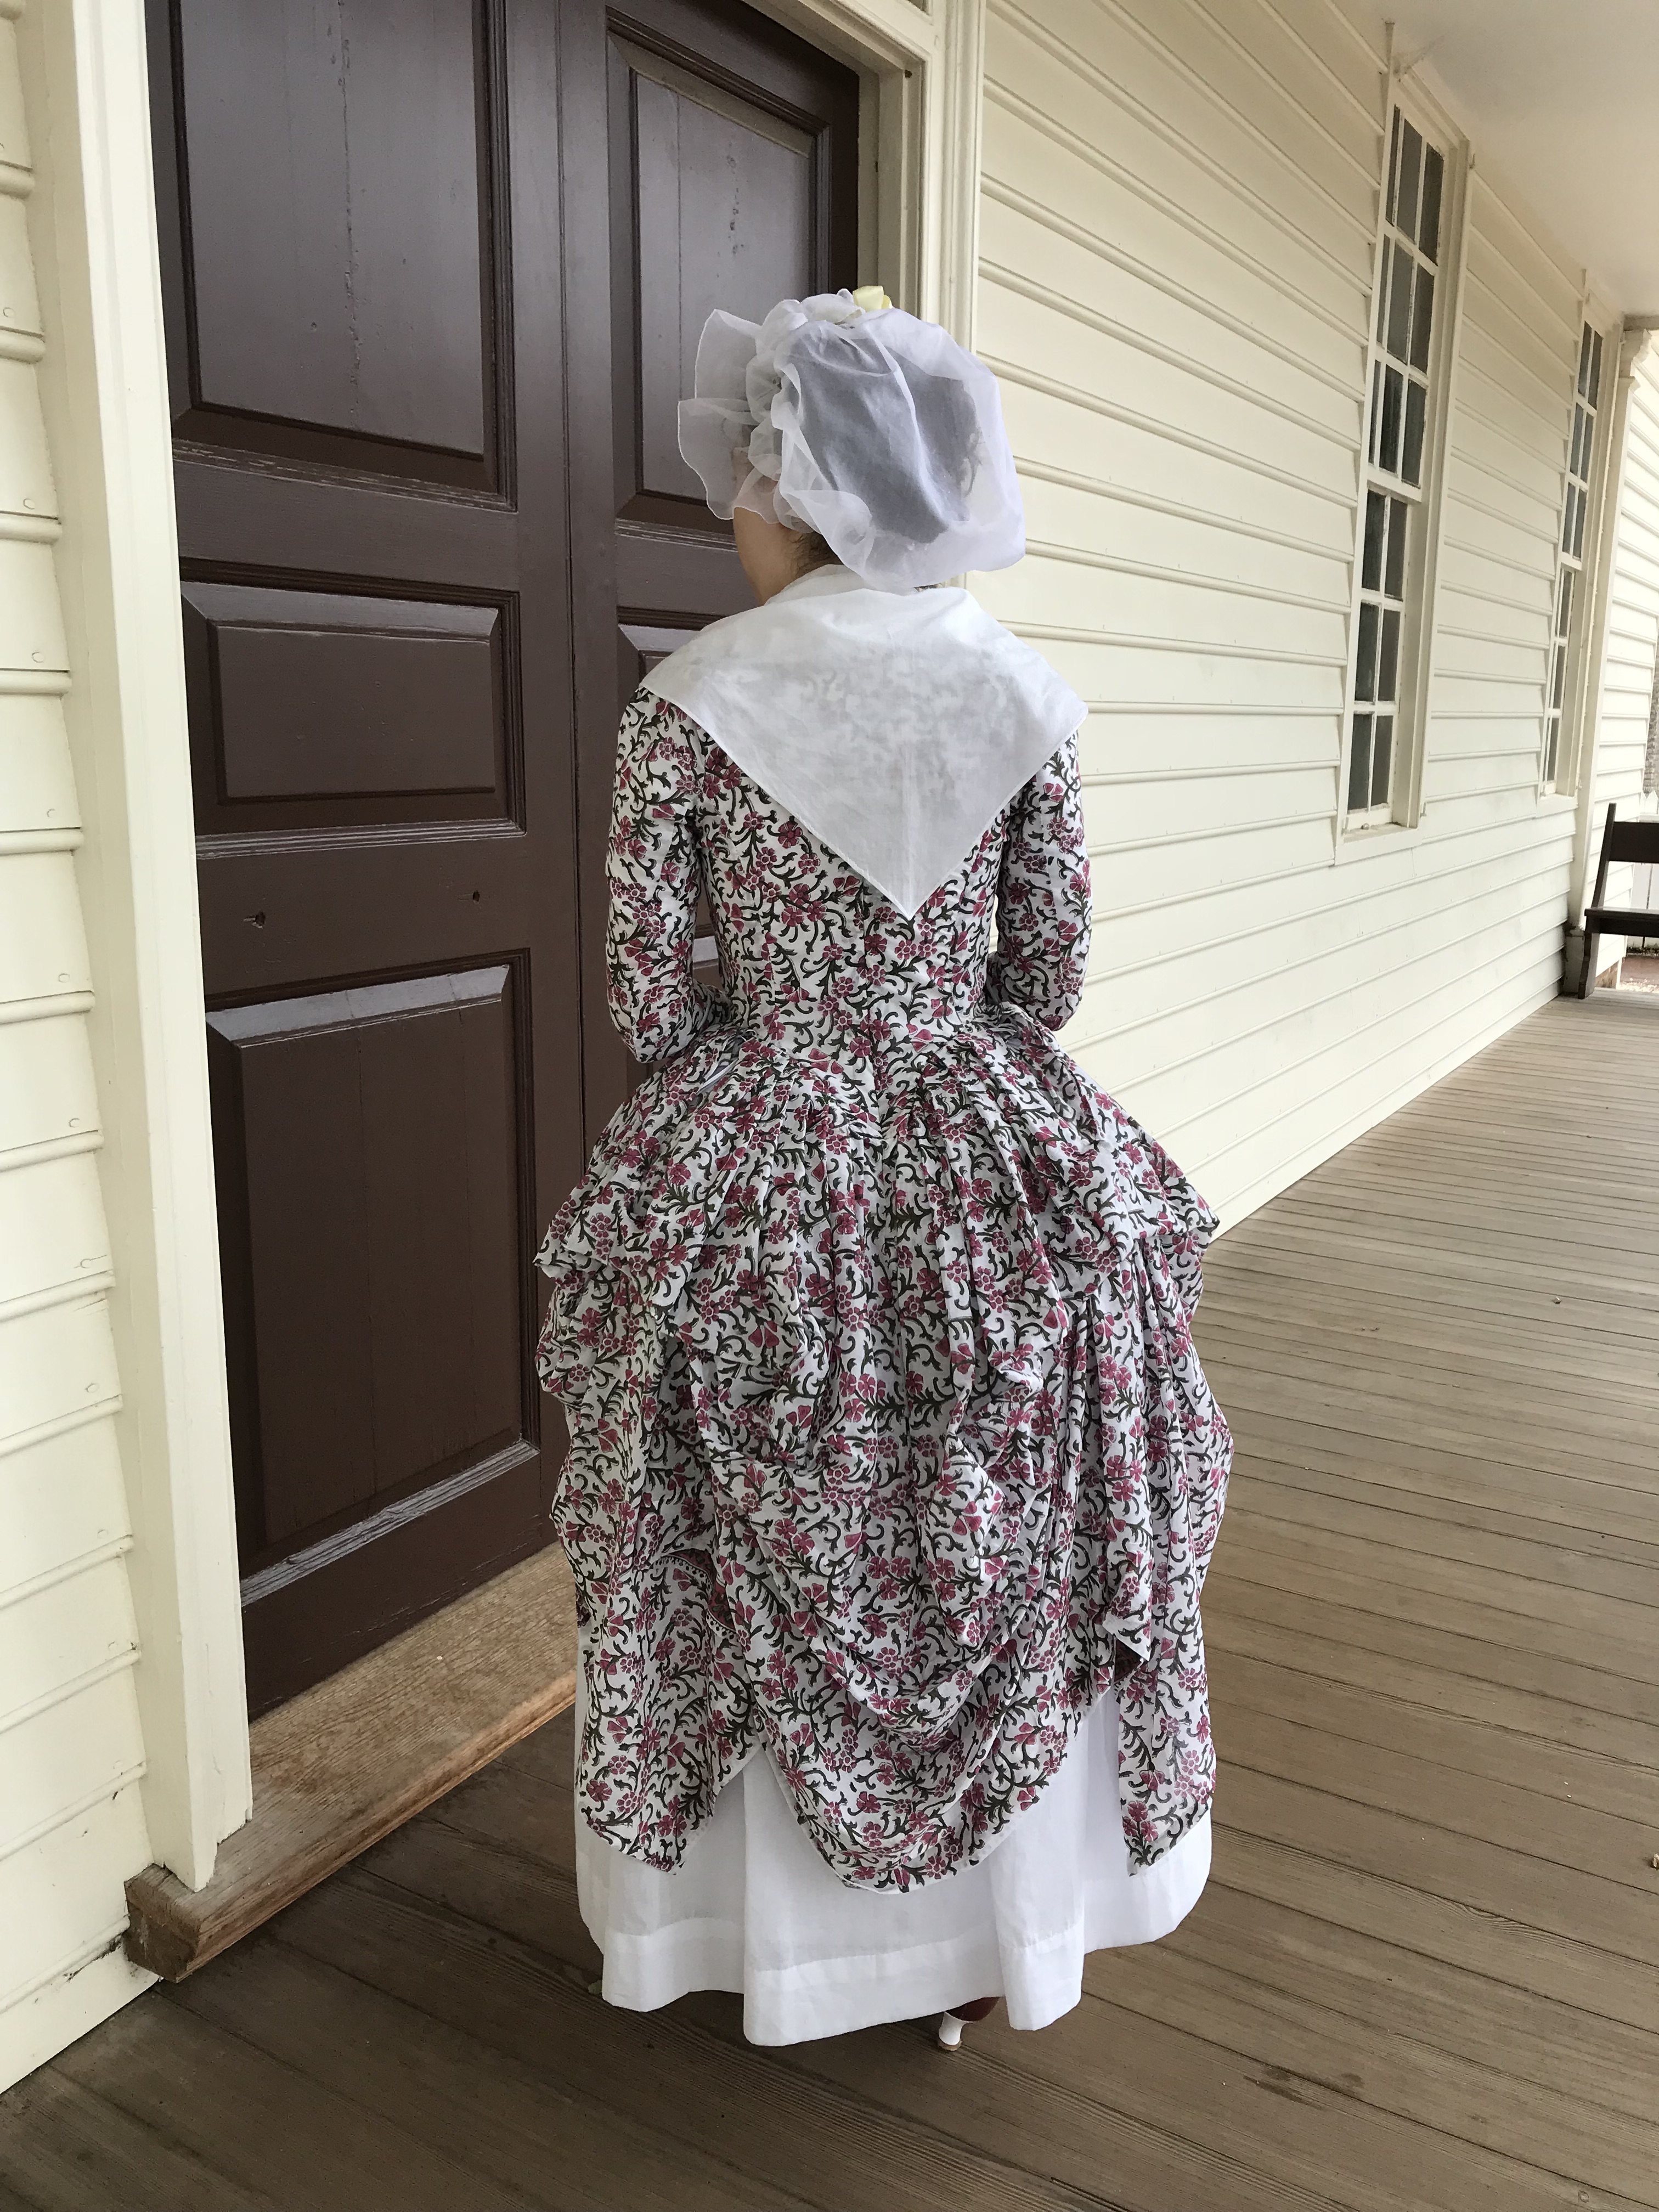
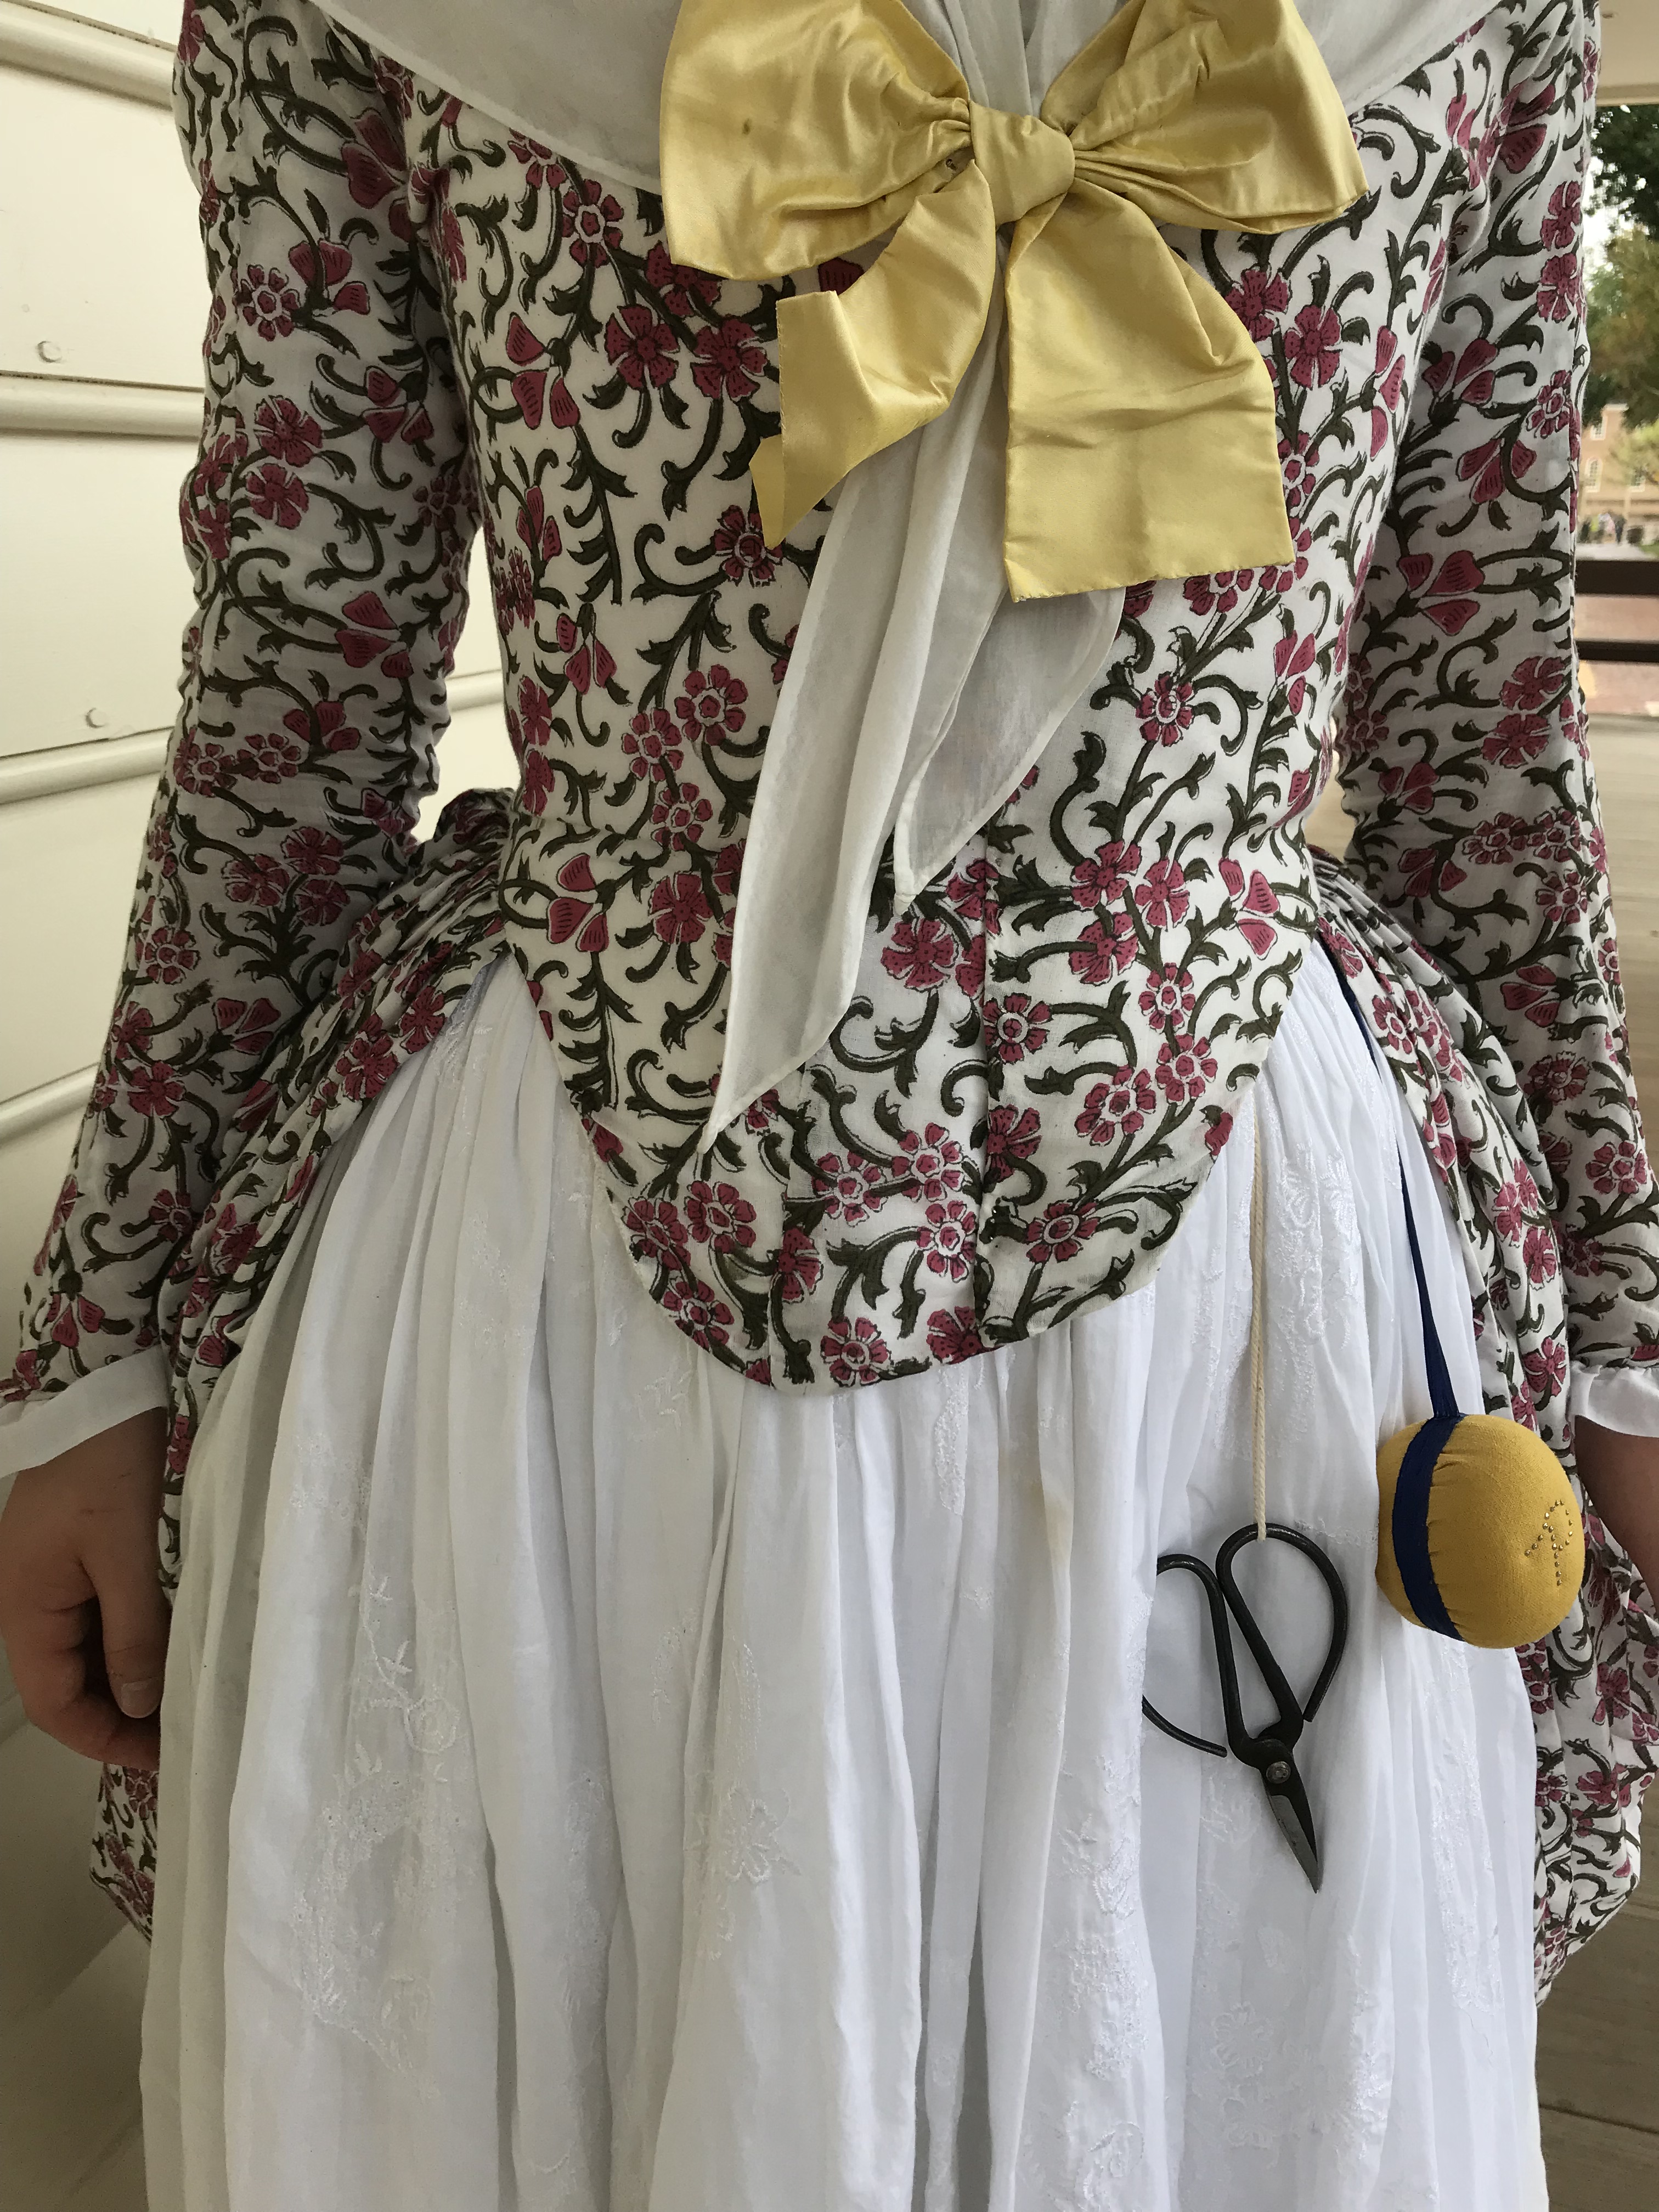
Here are some photos of the completed dress:
Cuff, with a decorative pleat tacked in
Messy top edges of the skirt are seen in extant examples, but I whip stitched the top edge of my pleats to prevent them from fraying.
I hope everyone is doing well, and thank you for reading! Hopefully I’ll post more regularly now that classes are done. I have several exciting projects in the works!
Before I write anything else, I want to say that I hope everyone reading this is doing OK during the COVID-19 pandemic. This is a really difficult time, and my thoughts are with anyone who is struggling. Please take care of yourself and your family, and socially isolate if possible, but remember that social distancing doesn’t mean emotionally distancing from your loved ones.
Anyway, I’m trying to write a blog post amidst all this craziness. It’s a new year, and I haven’t written for this blog since…November of 2019? Yikes. I’m sure that there will be an update post at some point, just chronicling my current projects et cetera, but for now, I wanted to share photos of my hand sewn stays from Costume Close Up. You can read about the construction up to this point here and here.
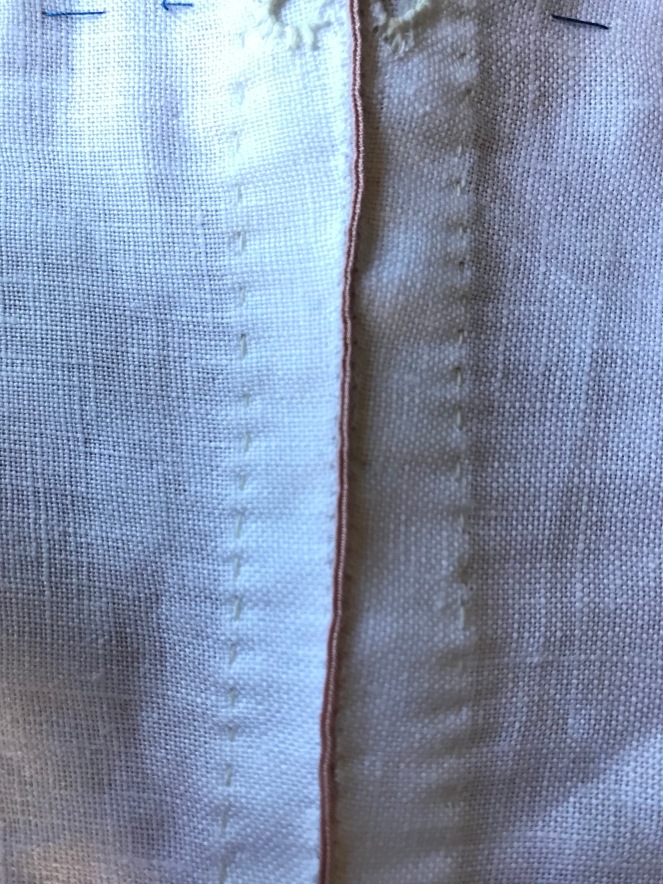
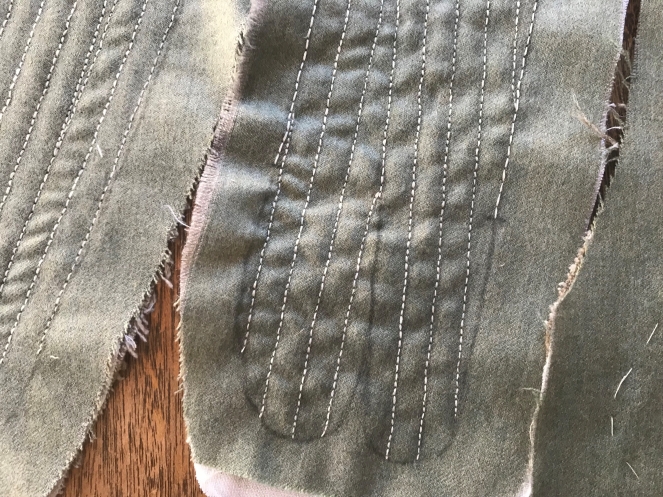
When last you saw these stays, the channels were mostly sewn, and they were basted together for a fitting. My next step was to finish stitching the channels (oh joy when that was done!). I then folded the seam allowances under and secured them with messy whip stitches.
At this point the stays looked like this:
I just realized that the back pieces (the ones with eyelets) are facing the wrong way in this picture…
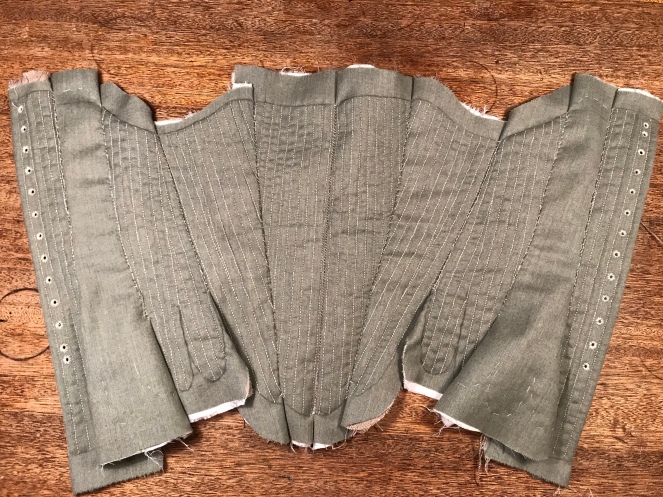
Next, I used whip stitches to secure the pieces together. This is done by holding the pieces flush at the edge and stitching through only the very edge of the panel.
After that, I put these stays away for a while and focused on other projects. When I finally got back to them (at the end of the summer of 2019), I cut away the excess seam allowance along the tops and bottoms of the panels and started binding the stays with scraps of white leather that I had from a previous project.
Stitching the leather to the top the stays, right sides together, before wrapping the binding around and whip stitching it to the inside of the staysBinding tabs at a reenactment, the day before the stays were worn
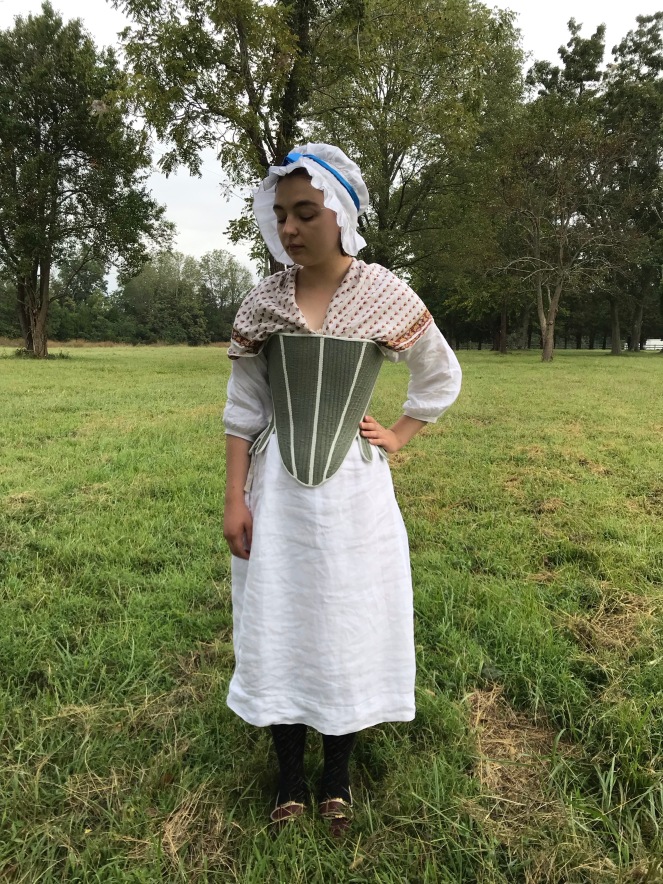
Once the binding was done, the stays were done! These aren’t lined, and may never be – I like how the raw insides look.
These stays were first worn at a reenactment I attended last fall. I took some pictures in my shift, under-petticoat, and stays, to show the base layer for 18th century attire, but ordinarily when I wear these, I wear them with a petticoat overtop (à la camp follower) or under a dress and petticoat.
I was rather tired when I took these photos…
They’re not laced all the way here. The lacing gap is usually even.
Here are some photos of the finished stays after one wearing. Note how much the reed forms to one’s body after only one wearing!
Thank you for reading, and stay safe! Keep an eye out for more posts in the next few months as I try to breathe some life back into this blog.
I started this gown a long while ago, all the way back in November of 2018, but I didn’t get around to finishing it until June! For the most part, I followed exactly the directions for this dress described in the Larkin and Smith English Gown Pattern, so I won’t go over the construction in depth here. If you’d like to make a similar gown, I highly recommend the Larkin and Smith pattern! It has clear instructions with color photographs as well as suggestions for materials and techniques. Most of my materials for this project came from Burnley and Trowbridge, and the green wool is the same as what I used for my hand-sewn stays.
Here are the photos I took during construction, in order of operations:
The back pleats were stitched down with spaced back stitchesA closer viewThe front of the bodice was stitched to the back of the bodice with spaced backstitches after the front of the bodice’s lining had been whipped to the back of the bodiceThe skirts were pleated to the back of the bodiceThe front edge of the bodice was finished with a running/whip stitchLacing strips for the interior of the front of the bodiceThe lacing strips were whipped to the lining and the rest of the skirt was pleated to the front of the bodice, after which the front of the bodice was finished with a running/whip stitch.GutsThe sleeve linings were pieced to use up scraps of linen.Sleeves constructed and hemmedThe cuff hem was finished with a running/whip stitch.The sleeves were set in the usual way, and the robings were applied over top, covering the shoulder strap lining but hanging freely after the join between the sleeve and the bodice. The top of the back of the bodice was bound with a scrap.Back
Guts
After all of that, I set the dress aside for a few months, then brought it out to hem it and to attach small cuffs to the sleeves. I also made a stomacher and a petticoat in matching wool.
Since then (that was in June), this dress has been worn twice, once by my friend Emma when we went to afternoon tea in 18th century dress and once by me at the William and Mary homecoming parade (yes I’ve moved across the country since I last updated this blog). Here are some photos:
Anyway, thanks for reading! Hopefully I’ll be more consistent about updating this blog in the last few months of 2019.
In addition to the historical costumers mentioned above, I also got inspiration from the Pinterest board I created for this project. Creating and editing this board helped me narrow down the year of my remake to 1783/’84. Having a specific year in mind when starting a new project is very helpful for nailing down details – for example, I was inspired by a 1784 portrait of Luise Auguste von Augustenburg to add puffed trim to the neckline ruffle.
My Pinterest board also served as inspiration for my hair styling et cetera, and for the cap that I’d one day like to make to go with this dress, to more firmly ground it in the year 1783 and to make this dress better for day wear.
Anyway, on to the actual construction of the dress.
Before cutting apart my old dress, I decided to get a head start on roll hemming the ruffle for the petticoat, which was a good idea – if I remember correctly, my ruffle was 18 inches wide by 4.5 yards long, meaning that I roll hemmed about 10 yards of silk gauze. After congratulating myself and resting my hands, I folded the ruffle and put it away until I had a petticoat on which to put it.
Next came the fun part: cutting apart the old gown! I did this carefully, preserving the sleeves and unpicking one by one my stitches holding down the pleats at the back of the gown.
The pleats from the back of the gown were pretty firmly ironed in place, and are still visible on the new gown, but some extant examples exhibit similar pleating, illustrating previous remaking, so it’s not inaccurate.
Somehow, the above photo is one of the only photos I have from the unpicking process. While deconstructing the old gown, I tried to reserve my pleated silk gauze trimming for the remake, but I realized that when I made the original gown, I didn’t know how to properly roll hem, so those scraps of silk gauze have been tucked away to be reused at a later date when I can redo their hems.
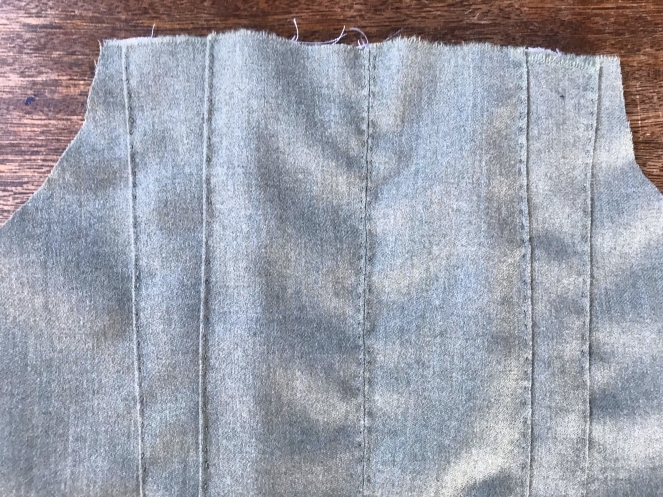
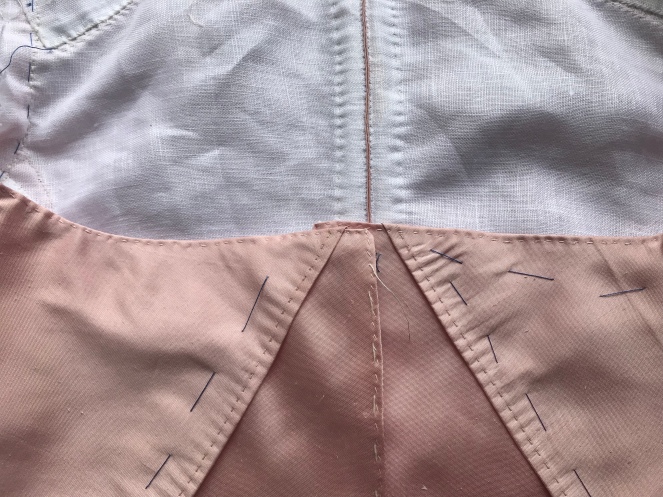
My next step was recutting the back bodice from the existing back bodice. However, when doing this, I made a mistake and didn’t include enough seam allowance, so the seam allowance on the fashion fabric of the back of my dress is really tiny, as are my stitches – I don’t want it to fray! The lining of the back of the bodice was cut from fresh linen, as the back lining of my old gown was not really suitable for my new gown, especially with a back point as dramatic as mine.
The back of the bodice was constructed with an English stitch per the American Duchess Guide, and it has two boning channels at the center back to keep the back point of the bodice stiff.
Next, I cut out the new bodice fronts and their linings. The bodice fronts on my old gown were too small, so I cut these pieces from some of the silk that I had left over from making the first gown, and the lining from fresh linen. I’m glad that I had so much fabric left over from the first time making this dress; it’s a good reminder to get an extra yard when possible. You never know when it will come in handy!
The bodice front lining was felled to the back lining, and then the bodice front was attached overtop, also with felling stitches.
Next, I finished the bodice all the way around the bottom edge and front edges with small stitches. I had to be especially careful around the back of the bodice because of my tiny seam allowance.
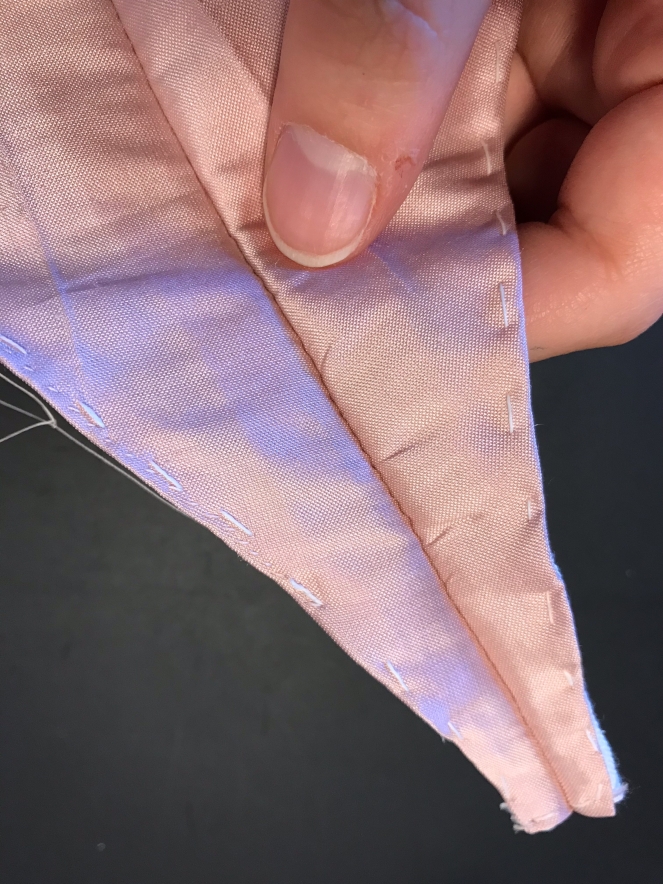
It took me a few tries to get the length of the front of the bodice right, and it was re-pinned and tried on several times.Basting made finishing the bottom edge much easier.Basting in white linen thread and itty-bitty stitches in silk thread at the back point of the bodiceThe interior
As you can see in the photo above, I cut one bodice front slightly wider than the other – this was to ensure that when I pinned the dress closed over my stays, the overlap would be even.
My next step was to cut out and attach the “zone front” of the bodice. This portion of the bodice functions mostly as an overlay, so it was unlined. Once I cut out the zone fronts, I hemmed the front edge, held them in place with basting stitches, and felled them to the side seams. The bottom edges of the zone fronts were folded under and basted in place.
The zone front before the side seam was felled into place
Next, I added shoulder straps and fitted the sleeves (which remained unchanged from the old version of this gown). The fashion fabric for the shoulder straps was cut from one of the bodice front pieces from the old gown.
I then finished the neckline of the bodice with small running stitches, treating the zone front and the main part of the bodice as one. The of the back of the neckline was later bound with a scrap of silk.
The back
The center front of the bodice
I decided to trim the bodice before it became too cumbersome to handle with the skirts attached. Around the neckline, I gathered down some delicate lace from PenelopeTextiles on Etsy, and then I added a double-ruffle of roll hemmed silk gauze as a tucker.
Working on lace placement (the petticoat had been finished at this point – more on that soon)Attaching the silk gauze tucker to the inside of the neckline
I also added moire ribbon in light green to the neckline. Each puff of ribbon was gathered down and then attached.
Next, I trimmed the sleeves. First, I shortened them a few inches, which seemed to be more in line with the portraits I’d looked at for inspiration. Then, I roll hemmed and gathered some silk gauze around each cuff. I attached some of the lace left over from the neckline to the edge of each cuff, and then I finished it off with a small green bow.
The inside of the cuff
At this point, I had already made the petticoat, but for the cohesiveness of this post, it makes more sense to discuss its construction now. I cut the petticoat from the few yards of silk I had remaining from when I made the first gown. The petticoat was constructed in the usual way which Lauren of American Duchess details here. However, before pleating the petticoat to the linen tape waistband, I added the gauze ruffle.
Attaching the ruffle was far more work and far more time-consuming than I had originally expected. First, I gathered my large roll-hemmed rectangle to a length of linen tape the length of the petticoat’s hem. I attached the ruffle with varying linen thread, pink silk thread, and white silk thread, because I had expected to cover the top of the ruffle with puffed trim (which I may still do).
Next, I stitched the linen tape with the ruffle to my petticoat. This will make it easier to remove if I ever want to use the ruffle to trim a different petticoat.
I wrapped the petticoat around the edge of my dining room table to keep it taut as I sewed on the ruffle.
I realized as I was attaching the ruffle that it was about two inches too short. I suppose that I could have placed the ruffle so that the gap was at the back of the petticoat, but then the seam in the middle of the ruffle would have been visible at the center front of the petticoat, so I decided instead to take in the petticoat side seam.
The petticoat hem after it was taken inNo ruffle gap!
After that was resolved, the petticoat was pleated to a linen tape waistband over my skirt supports to ensure that the hem was level, and the petticoat was thus completed.
The front waistband interiorThe back waistband interior
Now, back to the main gown – all that it needed at this point was a skirt. The skirts from the first iteration of this gown were still operational, so I ended up just re-pleating them to fit the bodice of the new gown. I put the bodice and petticoat on my dress form and pinned the skirts in place so that the hem was level, after which the skirts were attached with whip stitches.
I had to do a little fiddling to hide the lining at the tip of the bodice back, but once that was accomplished, the bodice looked quite cleanly finished from the outside. The tops of the skirts are raw on the inside of the gown, but that is also seen on extant gowns, so I’m not going to worry too much about it.
The center back of the bodice
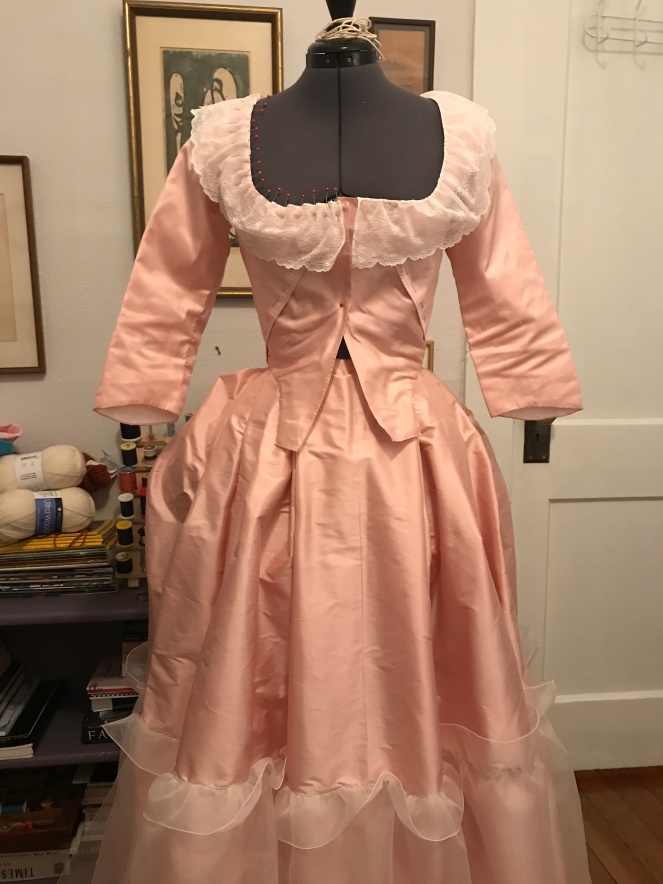
Once the skirts were attached, I sewed in some ties so that I could pull up the skirts à la retrousée. With that completed, the gown was done, and just in time!
A bit messy, but it works
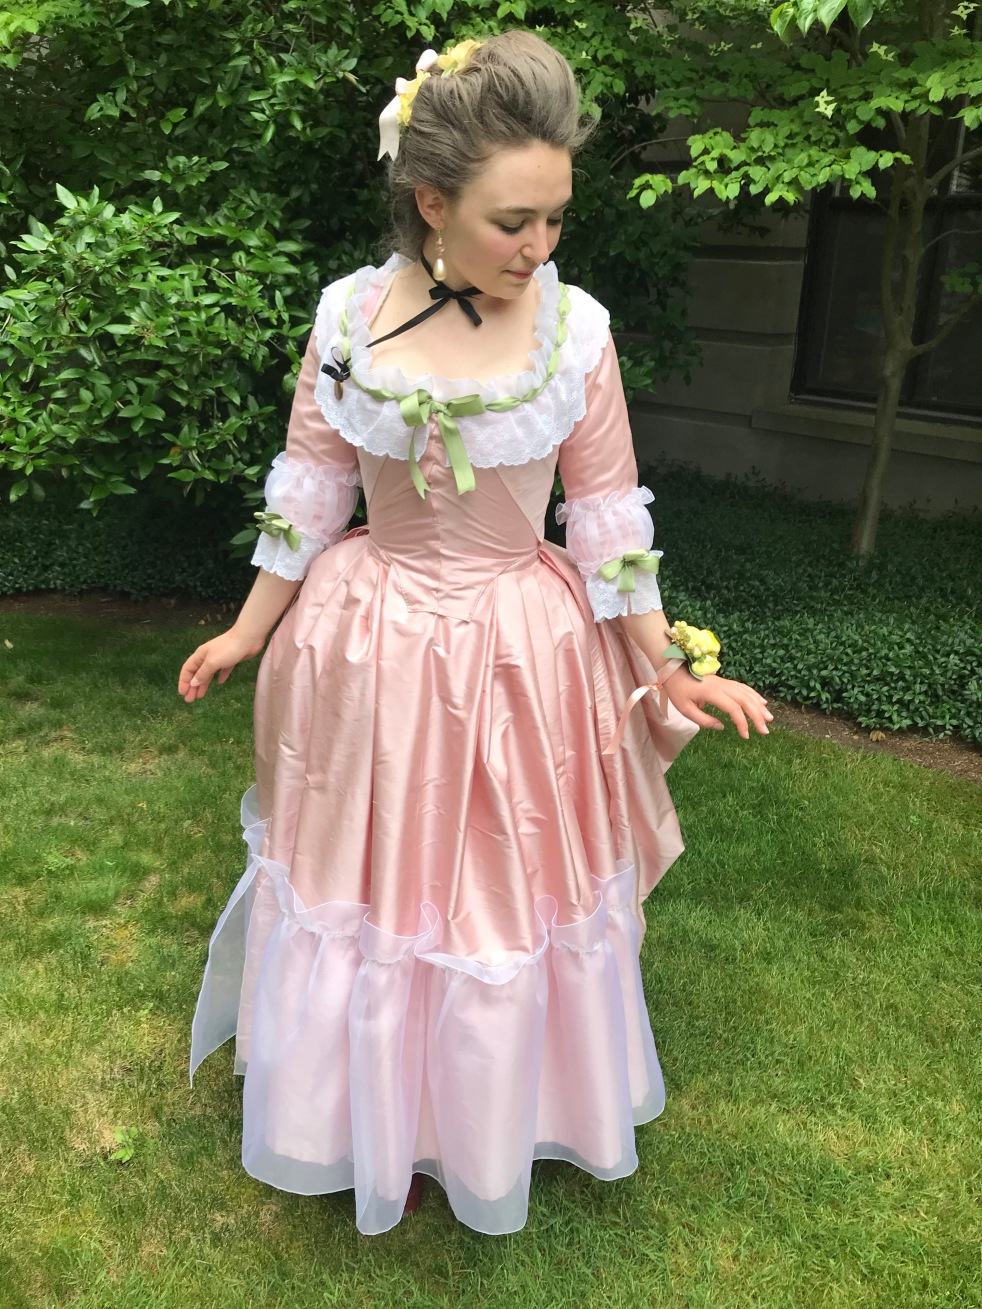
After consulting with some friends, I determined that I would not wear a cap. Instead, I used pomatum, powder, fake flowers, and ribbons to emulate the hairstyles I’d seen in portraits on my Pinterest board. In hindsight, I should have gone for a bigger hairstyle, but I can do that next time I wear this gown. I accessorized my gown with earrings, a locket, a bow at the center front, and a corsage (this was my prom dress, after all!).
Now for the photographs!
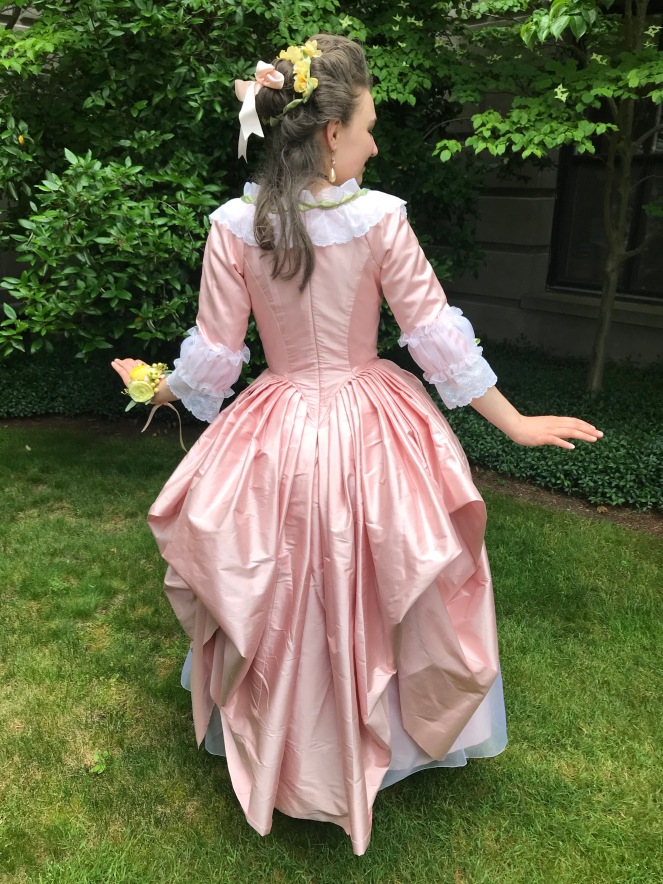
The backA close-up of the back – the pleats from the first iteration of this gown are very visible, which is totally fine!
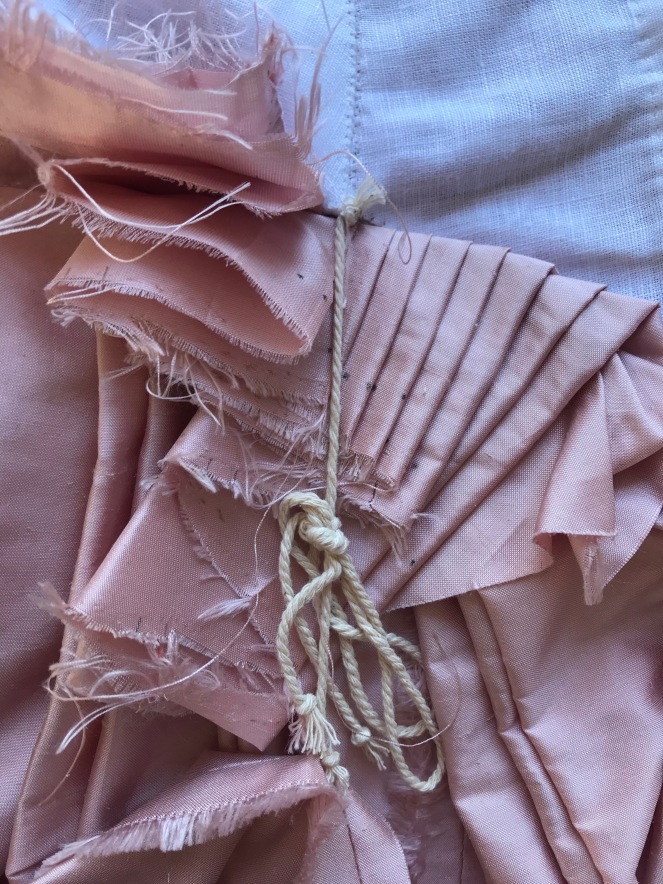
No (gown) guts, no glory!
While there are a few things I’d like to change (adding puffed trim around the petticoat ruffle and possibly the cuffs to match the neckline, attaching a panel at the center front to make it fit a little bit better), all things considered, I am positively thrilled with how this dress turned out. I got to learn about remaking 18th century gowns in newer styles, just like the mantua-makers of the 18th century, I breathed new life into an old favorite gown, and I got to wear a dress that I loved to my senior prom. If you are considering remaking an old gown or suit, I highly recommend going for it!
Thank you for reading! Hopefully, I’ll be better at updating this blog in the coming months.
Remember when I wrote that I had decided to hand sew a pair of 18th century stays? Well, I’m still stitching, and they are coming along. I’m going on vacation soon, so I hope that I can get some stitching done on the plane, but I figured that I’d write about my progress to this point in order to keep myself accountable.
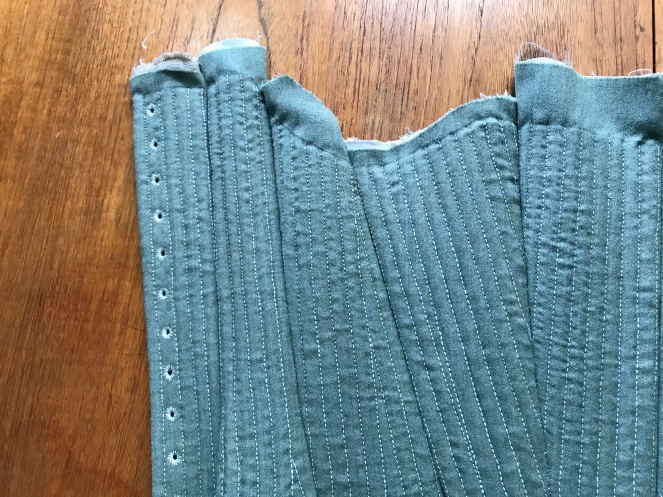
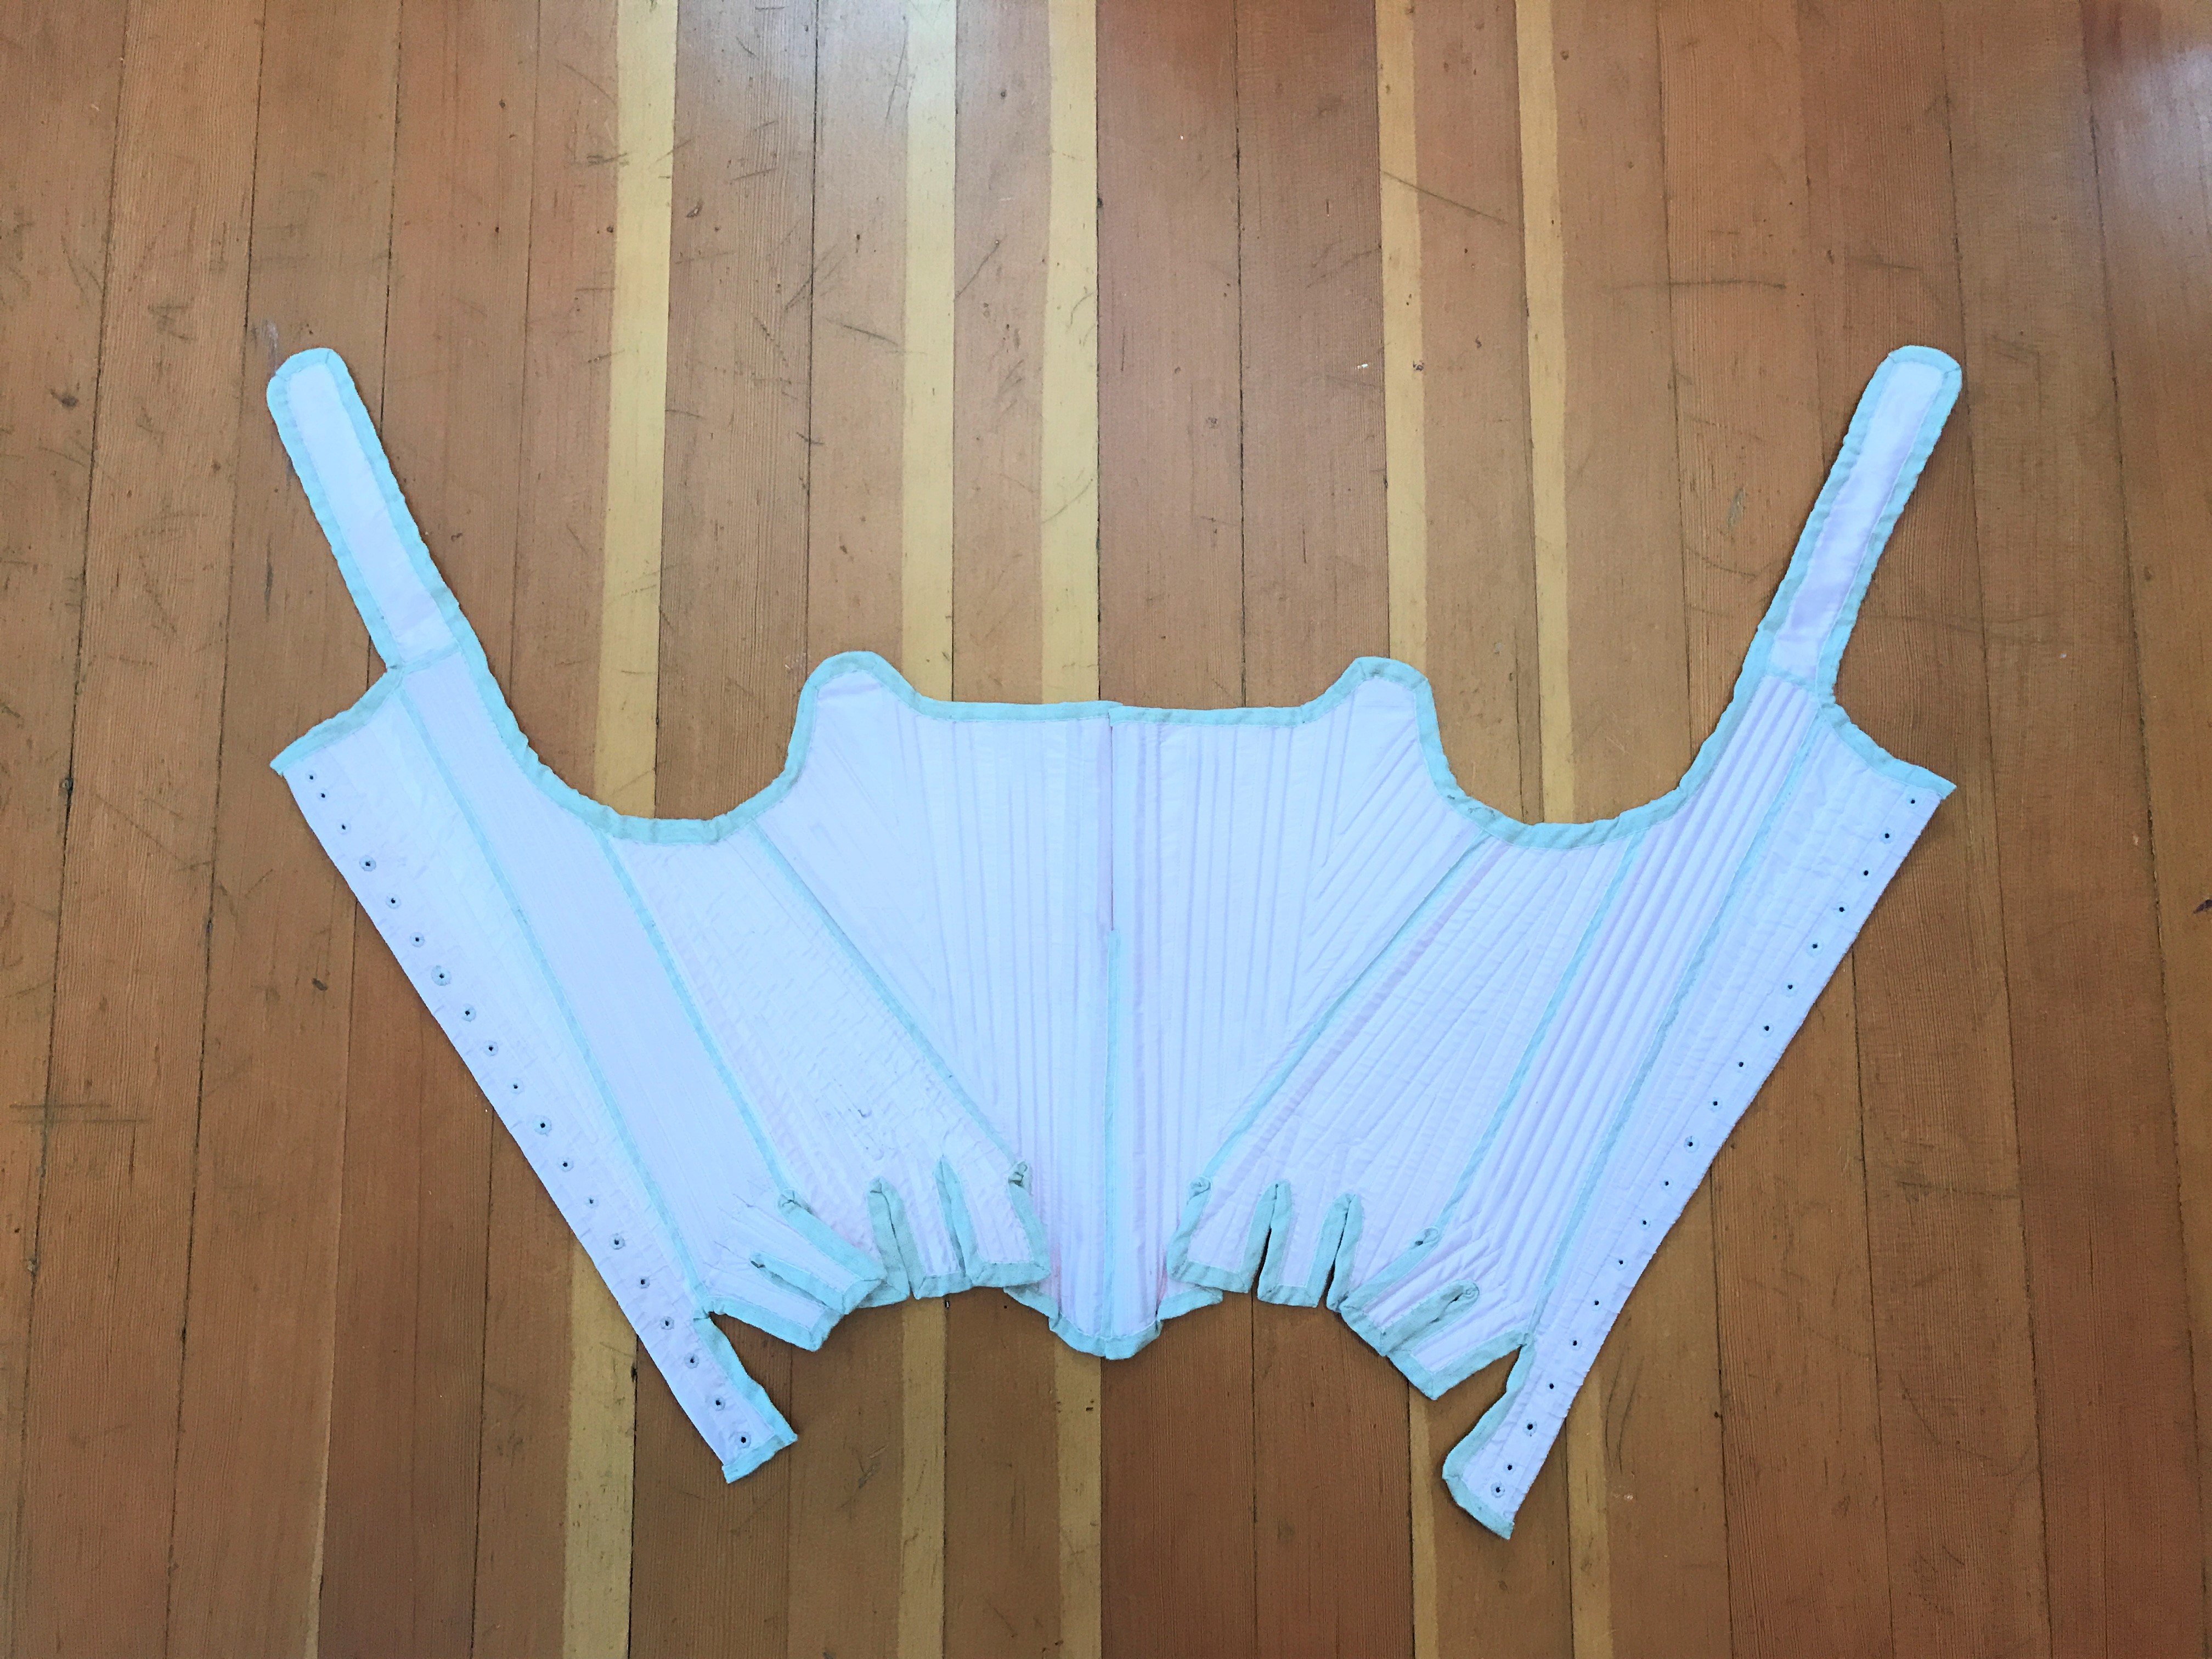
After figuring out a pattern, I cut out each piece in heavy natural colored linen, medium-weight white linen, and a light-to-medium weight wool (the natural linen and the wool are from Burnley and Trowbridge). Each pattern piece was basted together with the natural linen on the bottom, the green wool on the top, and the white linen sandwiched between the two. After the pieces were outlined, I commenced stitching channels 3/16 inch apart.
After that, I started stitching…
…and stitching…
…until each side looked like this:
The front panelThe tabs of panel three
As you can see, I also stitched eyelets in the back panels and added the cane boning for stability. Legitimate eyelets make it easier to lace the stays during fittings.
Before stitching the channels on the fourth panel from the front (the most problematic, fit-wise), I whipped the stays together for a quick fitting. They actually fit quite well!
After that fitting, I recorded my notes, ripped apart the temporary whip stitching, and continued stitching channels until every panel was complete. Since then, I have been outlining each panel with longer backstitches, which will make it easier for me to whip stitch the seam allowances at the next step. As of the time of writing, all but one panel has been outlined.
I hope to finish these stays soon, because I’m so excited to wear them! I’ll continue to share progress as it happens. Thanks for reading!
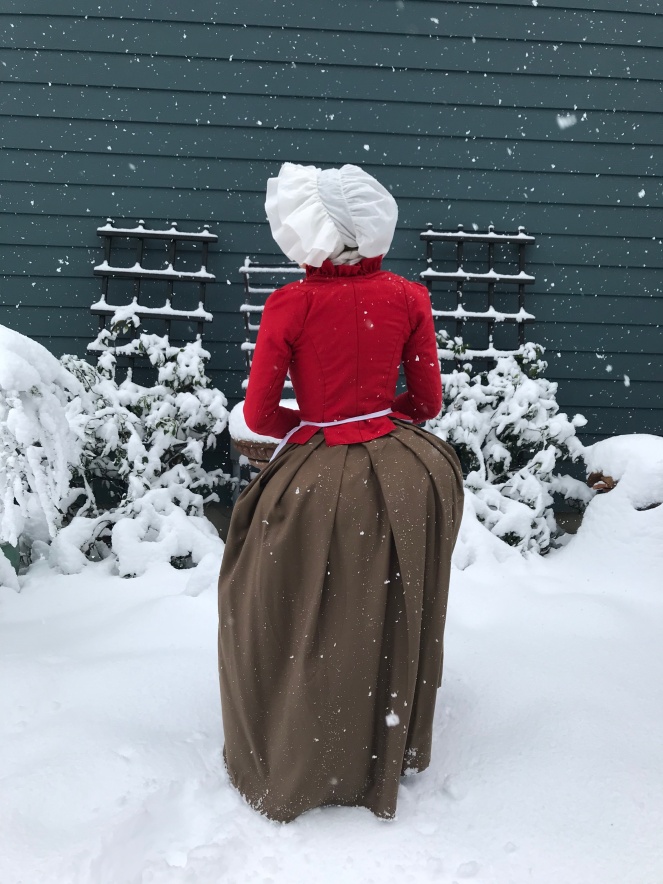
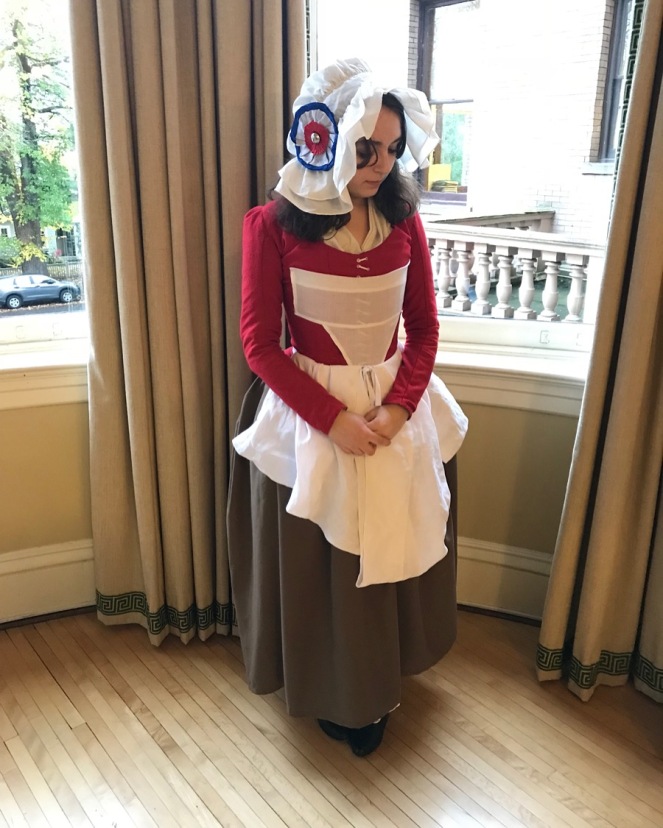
So, it’s been a while since I’ve posted… Hopefully, I’ll be able to sew (and write about it) more this summer. In the meantime, I thought I’d share some photos of my 1790s red jacket, as well as explain a few of my choices in styling it. When I first thought about writing this post back in November (!), I had intended to make it very research-heavy, but honestly, I don’t have the time for that. Maybe I will this summer. What I will share are some photos that are a rarity for me: snow photos! In the Pacific Northwest, we rarely get more than an inch or two of snow, but in early-mid February, we had an occurrence that has since been monikered “snowmageddon” (or “snowpocalypse,” if that’s your thing). My neighborhood got almost a foot of snow! So, I decided to take advantage of the freshly fallen snow one morning and get some photos of my red wool jacket ensemble in the snow. Without further ado…
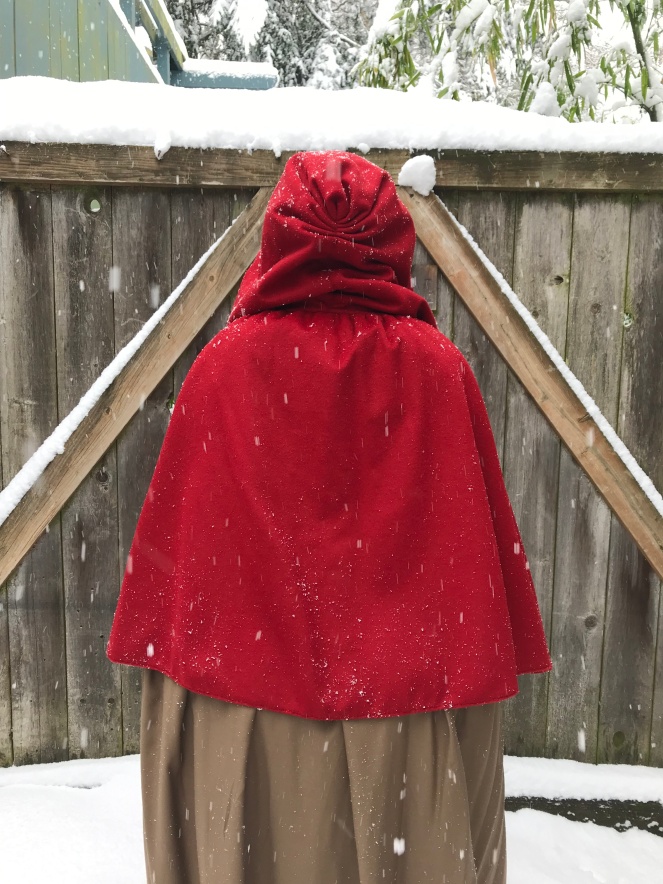
I also decided to try out my red cloak against the snow. With the possibly-inaccurate scrap silk lining, it was very warm. I ended up wearing it over my ordinary coat as a second layer when walking around in the 21st century, which was a success! I intend to better incorporate cloaks into my wardrobe next winter.
For my Halloween costume (yes this post is going up very late), I decided to dress for the French Revolution. Rather than pulling a Marie Antoinette and dressing in silk and extravagance (too expensive and time-consuming), I decided wear what I believed a Parisian working woman, perhaps a member of Pauline Léon’s Société des républicaines-révolutionnaires, would have worn. Instead of dressing as a member of the peerage, I dressed as a member of the mob, if you will. It should be noted that Parisian women played a huge role in the French Revolution, but that is a tale for another time.
I’ve always been enamored of this red jacket from the Kyoto Costume Institute. It was made in 1790s France, so it seemed like a perfect base for my own ensemble. However, no pictures of the back of the garment are available online, as far as I am aware. Fortuitously, this Instagram account posted a picture of a surprisingly similar extant jacket that featured pictures of the back of the garment. Based on the pictures he posted, I judged that the extant jacket in his collections was similar enough, time-period-wise, to the jacket at the Kyoto Costume Institute that I could probably use it as a source of inspiration.
Once I had my inspiration, I patterned and cut my jacket. The pattern is a modified version of my basic 18th century block, and the fabric is scraps of linen and red wool. I did a very 18th century thing and repurposed an old red skirt that I’d made for the jacket, though luckily I had saved the remaining fabric from making the skirt, so I had enough to piece the entire garment.
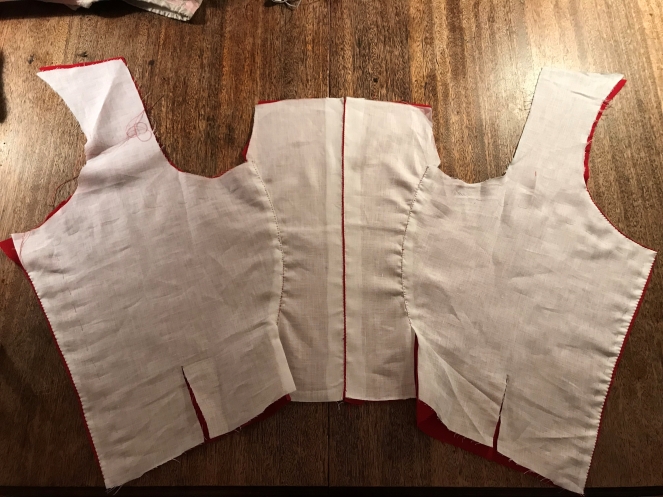
I constructed the back of the jacket first, using an English stitch for the center back seam.
Then, I constructed the sleeve linings. I decided to try to use up some of those scraps of linen that I think everyone who sews historical garments has: the bits of “cabbage” that result from cutting out oddly shaped linings. I then stitched along the outer edge of the sleeve lining.
I messed up on cutting the lining for this sleeve, so it got a fun cuff lining.
Next, I pieced the sleeves from the fashion fabric, and stitched the outer edge. The wool sleeve was then layered on top of the linen sleeve, both of them inside out and with the inner parts of the sleeve facing each other, and the inner seam of the sleeve was sewn through both pieces of fabric. I’m sorry if that’s confusing; I believe its called the tailor’s method for sewing sleeves if you’d like to look into it further. It’s my go-to.
Once the sleeves were constructed, I hemmed them and turned back to the body of the jacket.
The lining of the front of the jacket was whip stitched to the back of the jacket.
Then, I sewed the fashion fabric of the front of the jacket to the back of the jacket with whip stitches.
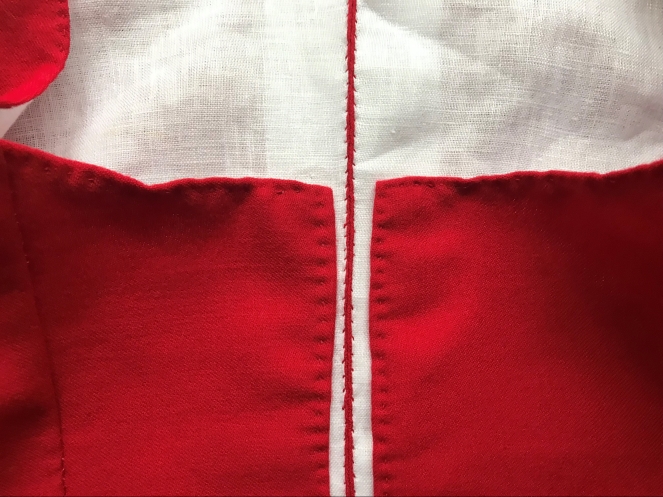
The front edges of the jacket were then finished with the edge stitch described in TheAmerican Duchess Guide to 18th Century Dressmaking. The tabs in the front of the jacket were created by slashing the fabric where the tabs were to be.
Next, I finished the tabs with more edge stitches. The tips of the slits were reinforced with buttonhole stitches.
Buttonhole stitches
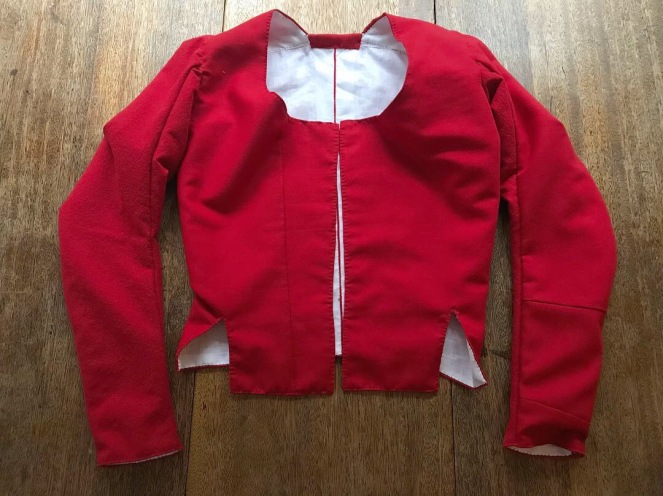
I attached the shoulder strap lining to the back of the jacket and then set in the bottom portion of the sleeves with spaced backstitches.
Next, I set in the top of the sleeves, each of which has two small pleats at the shoulder to make them fit in the armscye. Then, I covered all the raw edges with the wool shoulder strap (up until this point, it was unattached to the back of the jacket), finished the neckline with edge stitches, and bound the top of the back of the jacket with a scrap of wool.
Then, I sewed eyelets down the center front for spiral lacing.
I didn’t have time to add the ruffles in time for Halloween, so I wore it at this stage. I paired it with my 1790s cotton cap, a tricolor cockade, a new brown wool petticoat, and a new pinner apron.
After wearing the jacket for Halloween, I put it away for a few months before adding a wool ruffle at the neckline and cotton ruffles at the cuffs. I may remove the wool ruffle; I need to see how it looks with the rest of the ensemble, but I have a feeling it may be too much.
Hopefully, I’ll get some better pictures of the ensemble with the completed jacket soon, at which point I’ll probably write a blog post detailing my choices in styling the outfit.
In September, I had the opportunity to visit Colonial Williamsburg. My cousin was getting married in Virginia, so my mother and I decided to go a few days early and spend two days in Colonial Williamsburg. If you don’t know what CW is, it’s the most magical place on earth an 18th century living history town in Williamsburg Virginia. There are museums, trade shops, and interpreters, all of whom are extremely knowledgeable. If you get a chance to visit, I’d highly recommend it.
This post is going to be mostly pictures, but I figured I’d explain a little bit about what I wore both days first. The first day we were there, I went for a lower-class 1770s ensemble with my blue linen round gown with a new linen cap, a Burnley and Trowbridge neckerchief, and an old apron. I unfortunately hadn’t had time to finish making a linen pinner apron, so my embroidered cotton apron may have been a bit out of place, but oh well. The second day we were there, I decided to dress based on the outfits seen in illustrations of fashionable mantua-makers/milliners and wore my floral Italian gown with my massive gauze cap.
Without further ado, where are some of the many pictures I took!
Day 1:
The beautiful gardens in CW
I didn’t take many pictures on the first day, mainly because we arrived in the afternoon and the lighting wasn’t great. Additionally, we were there during Hurricane Florence (which ended up missing CW completely), so there weren’t very many people, and some of the historical trade shops were closed that day.
We did manage to find a historical tavern for a late lunch (I think it was the Chownings Tavern), and I highly recommend the vegetable pasty. However, if you are vegetarian like me, know that there are limited options in Colonial Williamsburg and you may want to bring some of your own food.
Day 2:
My cap melted a bit in the rain, but oh well.
On the second day, we visited the Margaret Hunter Millinery Shop. I spent probably an hour listening to the women in the shop discuss their trade.
A fashionable gown and quilted petticoat made by the mantua-makers in the shop
A confection of a hat made by the mantua-makers/milliners in the shop
We also had the privilege to visit the tailor’s shop.
The tailor’s shop had an enviable stash of fabric.
Examining a jacket being made by the tailor’s apprentice
Tailors in the 18th century also made ladies’ riding habits, such as the red one seen hanging here, which they were kind enough to let me examine. The workmanship was beautiful.
We also visited the apothecary’s shop.
In addition to the shops mentioned above, we visited many other historic sites. One of my favorite buildings was the coffeehouse, where we were served 18th century-style hot chocolate (a true delight) and learned about these “dens of sedition.” The shoemaker’s shop was also very fascinating: I’d love to one day learn how to make shoes, so it was a treat to see the process up close.
The art museum, too, was a great stop: I was particularly intrigued by the exhibition of printed cottons, which not only displayed a multitude of clothing that I’ve only seen in books or online, but also explained the process of printing fabric in the 18th century. If you are able to visit CW, the art museum is a must-see.
While we were there, we also visited some of the many stores. I bought two yards of printed cotton, which you may see here at some point in the form of a 1770s jacket.
All in all, it was a wonderful trip, and I’m very grateful I had the opportunity to visit Colonial Williamsburg.
I’m unsure why I haven’t yet posted about this shirt, but I haven’t been very good at blogging this fall. Hopefully I’ll have more time to write in December!
For the first time I wore my Robespierre costume, I wore a shirt that was decidedly sub-par: it fit awkwardly because the sleeves were too short and the neck opening was too big. Now, you may think that I would have first fixed my shirt when I remade my Robespierre ensemble, but you would be wrong. Instead, I decided to make the bear of the project, the frock coat, first. So the day I intended to wear my ensemble (Friday of Costume College), I was still stitching buttonholes in my cuffs, and the shirt wasn’t actually hemmed until after Costume College. C’est la vie. Luckily, my second shirt fits quite well, and it’s very comfortable. Additionally, it’s entirely handsewn, which makes my Robespierre ensemble now entirely handsewn, which makes my heart happy.
I didn’t take many construction pictures, but the shirt is sewn with linen thread. All of the seams are backstitched and then felled with whip stitches. The patterning and construction are based on the shirts described in Costume Close-up and Everyday Dress of Rural America, 1783-1800, and particularly on the shirt featured in Fitting and Proper, the date and appearance of which corresponds most closely to the shirt seen in Robespierre’s portrait. The neck and cuffs of the shirt fasten with antique Dorset buttons (I believe that they’re from the turn of the century), but I think that the thread buttons that Hannah of Fabric & Fiction describes would be more accurate.
Maximilien Robespierre, 1790 (anonymous), held at the Musee Carnavalet, via
As you can see, Robespierre’s shirt seems to have a neck ruffle that is almost pleated, so I did my best to emulate this by neatly gathering my neck ruffle with whipped gathers.
Here are some pictures of my completed shirt:
The collar may look high, but it folds down when the shirt is worn.
I reinforced the neck slit with a triangle of fabric embroidered with my initials and the Roman numeral I. At the time, shirts (and shifts) were numbered so that they would be easy to differentiate because they would often look quite similar and most people had several.
The triangle of fabric here is the neck gusset – there is one on each side, to allow for the curve of the shoulders.
The underarm gusset
The cuff features decorative top stitching along the top and bottom.
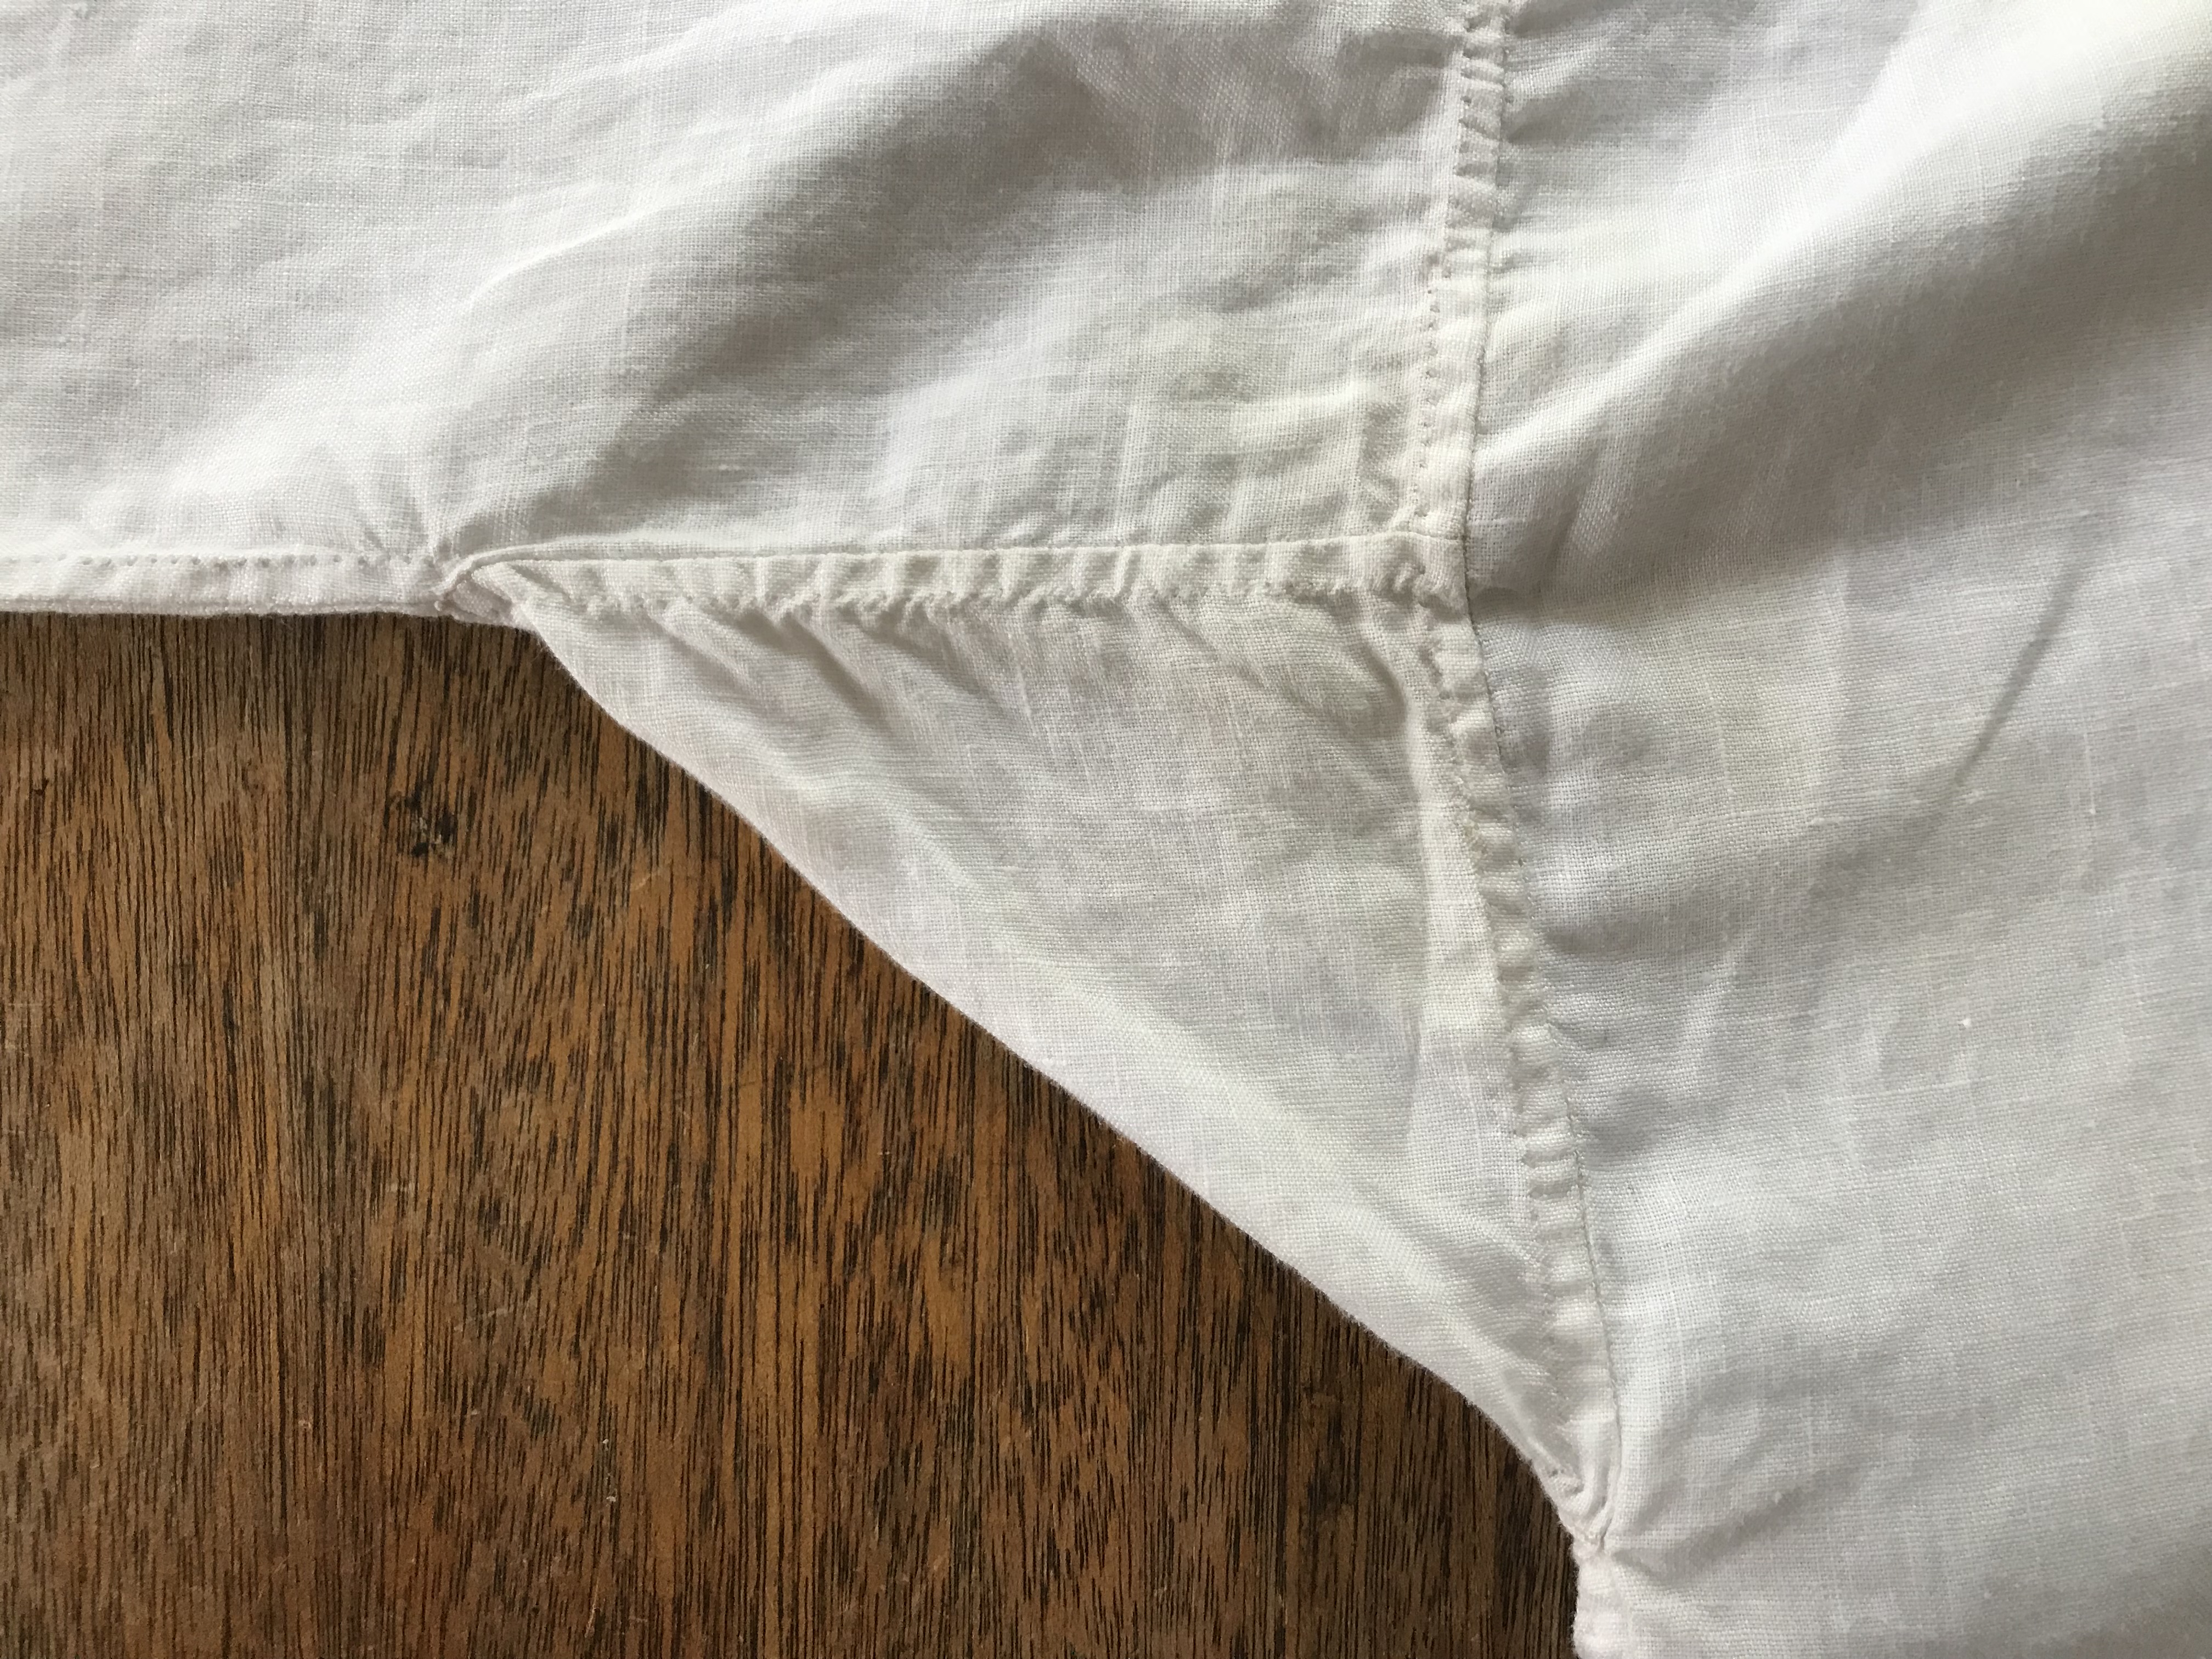
Most 18th century shirts were long enough that a side slit was necessary for mobility.
The side slit is reinforced with a gusset.
After having made this shirt, I have a few tips that I think might be helpful if you would like to make your own 18th century shirt:
Make sure that the length of your collar corresponds to your neck measurements, with room for a slight overlap. If it’s too big, it will pull at the shoulders of your shirt uncomfortably.
Give the shirt enough extra fabric to gather it to your collar. As you can see, my shirt is hardly gathered at the neck and it should be more so.
Make your sleeves a little bit longer than you think you need. Sleeves that are too long are more comfortable than sleeves that are too short.
If your shirt seems stiff after having sewn it, try washing it (by hand). The linen should soften up.
Thank you for reading! If you have any tips for making 18th century shirts and shifts, please share them in the comments.
One of the first things I learned when I decided that I wanted to try historical costuming was that the right underpinnings are necessary to create the right silhouette. For most of the 18th century, these underpinnings consist of a shift, some sort of skirt support, petticoats, and stays. Because of this, stays are one of the first things one has to make/buy when one starts costuming. Stays also happen to be one of the hardest garments to fit because they have to reshape the body in the correct way without being uncomfortable. Thus far, I have made two pairs of stays: the first are wayyyyy too short in the waist, and the second are better, but the fit isn’t yet perfect. Additionally, both of them are machine sewn. In short, because I currently lack a pair of stays which I truly like, I am therefore going to make a new pair.
My first stays, which were too short
My second stays (they weren’t entirely completed in this picture)
If you haven’t read Linda Baumgarten’s Costume Close-Up, she includes a pattern for stays from circa 1740-1760 (accession number 1966-188 in the Colonial Williamsburg Foundation collections). I cannot find a picture of these stays online, but they are strapless and back lacing with a total of 10 panels. I find them to be quite aesthetically pleasing; they have back stitched panels, are bound in leather, and have a lovely shape.
Because I like the stays in Costume Close-up, and because I like the era (I will be able to wear them under stomacher front gowns and with lower class ensembles from a bit later), they are my main inspiration. For my pattern, I made an amalgamation of the pattern in Costume Close-Up and my pink stays (see above). I mocked them up in cardboard to ensure fit, after which I cut out my fabric. I’ll share more on these stays and the process of making them soon, hopefully.
But why am I hand sewing stays? My main reason is that I want my stays to be as accurate to the 18th century as possible. I’ve seen a few illustrations of women wearing stays without a dress over top (these may be satirical illustrations that do not actually reflect common sartorial practice, but they are interesting nonetheless), and I think it could be a fun look to recreate. However, I do not want to recreate these looks unless I have hand sewn stays because of the stays’ visibility. It’s also satisfying for me to be able to say that I’ve hand sewn everything I’m wearing. My other reason for hand sewing stays is that the back stitching is very relaxing and can be done while doing most other things (such as listening to podcasts). Because of this, I’m hoping to complete one panel per week and finish them up over Christmas break. That would be record stay time for me; my previous two sets have each taken me at least 4 months!
The Camp Laundry, from the British Museum (Side note: I love their caps and I may recreate the ensemble of the woman on the left at some point. Also, look at the petticoat the woman on the right is wearing! Changeable silk!)
Thank you for reading this brief update, and keep an eye out for my next post! I should be blogging a bit more regularly soon.


